Showing posts with label Cheese. Show all posts

Wednesday, May 31, 2017

Kitchen DIY: Goats' curd

Q: What do you call a goat that's sitting around doing nothing?

A: Billy Idol.

I'm sorry, I couldn't resist. I fell down a rabbit hole of goat memes on the internet the other day and bad goat jokes were rife. Believe it or not, the Billy Idol example was one of the better ones.

Goats have been on my mind because today's Three Ways With... column is all about using goat meat, milk and cheese. The latter has become much more common in New Zealand in recent years -there were loads of great goats' cheese entries in the recent Outstanding Food Producer Awards, for example - but the former two are only just on the cusp of being mainstream. It's a pity, because they're delicious - and they tick all the boxes in terms of careful production and quality.


I was inspired to make my own cajeta (pictured above) after tasting Hamilton company Cilantro's version. Making your own is fun, not difficult and yields a generous amount that will disappear quickly. It's the closest thing I've tasted to manjar, the highly addictive Chilean dulce de leche. One spoonful and you'll never be satisfied with salted caramel again.

If you're too pure to sully your palate with such decadence, but want to have a play with goats' milk in the kitchen, I strongly recommend DIY goats' curd. I make it quite often (short-dated goats' milk is often on special at my local food emporium) and it's the sort of kitchen magic trick everyone should know how to perform.


DIY Goats' Curd
This is about as simple as cooking gets - milk + heat + coagulant + time = soft, creamy goats' cheese. Smoosh a bit on some toasted baguette, drizzle over some extra virgin olive oil and bliss will be yours.

500ml (2 cups) goats' milk
3 Tbsp freshly squeezed lemon juice
a pinch of salt

Heat the goats' milk until simmering point. Remove from the heat and stir in the lemon juice. Let sit for 10-15 minutes, until curds have begun to form. While you're waiting, line a sieve with muslin (I use a very fine cotton table napkin) and set it over a large bowl.
Carefully pour the curds/milk into the sieve. Leave to drain for at least 20 minutes, pressing it gently to squeeze out the whey. If you're not in a hurry, you can put the sieve/bowl arrangement in the fridge and let it drain for a couple of hours.
When you're ready, scrape the curds into a small bowl. Use immediately or cover and store in the fridge.

Are you a fan of goats' produce? Or do you have a good goat joke to share? Let me know!

Wednesday, October 07, 2015

Five ways with cheese

Smile, it's National Cheese Month! I know these things (National Donut Day, anyone?) are spurious at best, but if the New Zealand Specialist Cheesemakers Association wants us to dedicate October to the noble activity of eating cheese, I'm not about to argue.

Instead, I humbly offer you five of my favourite cheesy recipes...


 Secret cheese and onion bread - soft, white, pillowy dough, with a molten cheese middle. Blissful.


Roasted cauliflower cheese - exactly what it says, but with spices (and optional potatoes, or greens, or both).


Jenny's cheesy potatoes - an absolute Corry family classic (no one can make them like Jenny can, but with practice, you can nearly reach cheese and potato nirvana).


Bermuda salad - a Moosewood Cookbook number, in which cheese plays an important but not overpowering role. I was dubious too, but it's very good.


Sara Lee cheesecake - looks just like a bought one, tastes a million times better (and is about as easy to make as pulling one out of a packet).

What's your favourite thing to do with cheese?

Saturday, September 12, 2015

Good things: September 2015

Like a lot of food bloggers, I get asked to spruik a lot of stuff. Mostly, I don't do it, not least because I often have no interest in the products they're flogging. I'd also like to think I have more respect for my readers than expect them to read posts that say 'look, here's something I got for free and you didn't'.

But every now and then I find something that I think really DOES warrant being written about. Here are a few of these things that have crossed my path recently.


I'm ashamed to admit it, because in theory I have a herb garden at my disposal, but this new range of lightly dried herbs from Australian company Gourmet Garden is really, really good.
If fresh herbs go to your fridge to die, half-used (or, like me, you can't be bothered trekking to the bottom of your garden in the dark to pick your own), then these will be a god-send. Like the name suggests, they're very lightly dried, so they last up to a month once opened but they're still 'live' enough to taste fresh and perky. There are three herbs - basil, parsley and coriander, plus ginger and chilli. I'd love it if they did hard-to-find herbs like tarragon and dill too, but maybe I should just hurry up and grow my own.


According to conventional wisdom, eating ginger biscuits is a guaranteed remedy for morning sickness. In my limited experience, this is an outright lie. All it did for me was a) get crumbs in the bed and b) make me feel sick whenever I saw a packet of ginger biscuits. It's taken me a long time to get over that Pavlovian response, but I've finally cracked it. Just in time, too, for the arrival of Nairn's Stem Ginger Oat Biscuits in New Zealand. These are seriously good, with little nuggets of proper stem ginger inside, and a crunchy texture. They're also not too sweet, and good with cheese. Speaking of which...


...this isn't new, but our amazing neighbours brought it over last weekend. It's Ngawi Brie, made over the hill in the Wairarapa by Miles and Janet King of Kingsmeade Cheese. I interviewed the Kings a few years ago and I've made a conscious effort to support them by buying their cheese ever since (such a sacrifice).

Last of all, I've made a surprising discovery at the other end of the scale. It's this - Pam's Cocoa.


Believe it or not, this is the best supermarket cocoa you can buy. It knocks spots off the Cadbury Bournville stuff, which is like light brown dust in comparison. True, it's not Valrhona, but it's also much more wallet-friendly. And that always leaves a good taste in my mouth!

What new discoveries have you made this month?

Monday, March 17, 2014

Miso and lemon mousetraps

Do you remember mousetraps from when you were a kid? I couldn't wait to make them when the Small Girl was smaller, mainly so I could eat them myself. There's something about salty, savoury Marmite that goes so well with slightly scorched bread and cheese. But I've found something that goes even better - a mega-umami hit of miso. I know it sounds unlikely, but one bite and you'll be hooked. The only thing that makes it better is a squeeze of fresh lemon juice on top. Trust me, it's a winner.

Miso And Lemon Mousetraps Photo And Recipe Credit: Lucy Corry/The Kitchenmaid

Miso and lemon mousetraps
The beauty of these mouth-watering morsels is that you can make a whole trayful to serve with drinks when  you are unexpectedly pressed into hostess service, or you can make a whole trayful and call it dinner on those nights when all you want to do is collapse on the sofa. You can use any kind of bread you like - baguette, a coarse-textured country loaf or even a cheeky gluten-free number, but nothing too wholegrain-y. Keep the slices about 1/2 a cm thick for best results and only toast one side so you get the soft/crunchy texture thing happening. I've kept quantities vague, but keep to the suggested ratio of miso to butter. Don't forget the lemon, either. Any leftover miso-butter mixture can be kept in a covered container in the fridge.

sliced bread, as above
1/2 cup white miso
1/4 cup unsalted butter, softened
50-100g tasty cheddar cheese, finely grated
1 juicy lemon

Preheat the grill and line a baking tray with foil or baking paper. Lie the slices of bread on top, then put under the grill until golden. Don't do what I do and wander off, unless you have an unlimited supply of bread to replace the charcoal that those forgotten slices will become. Take the tray out of the oven and turn the slices over, so the toasted side is facing down.
Put the miso and butter in a small bowl and mix until well combined. Generously spread the non-toasted side of the bread with this mixture, then scatter some grated cheese on top. Return the tray to the grill and toast until the cheese is crispy and the edges of the bread are darkening.
Let cool briefly before serving with a squeeze of lemon on top.  These are best eaten the day they are made.

Tuesday, October 22, 2013

Middle class coleslaw

I am a terrible snob. I'm not proud of this shortcoming but since there's no point in denying it so I may as well be bold. I know I am a terrible snob because I once told someone that his mother made white trash coleslaw. In my defence, he said (and did) much, much worse to me. And that coleslaw was disgusting - tinned pineapple, cabbage, carrot and condensed milk dressing - so I don't think I was completely out of line. Plus, his mother used to look at me like I was something she'd trodden on. Harrumph.

Anyway, that's all ancient history and I'm over it, truly. But earlier this evening, when rustling up an impromptu salad to go with the remainder of Monday night's roast chicken, I realised I was essentially making coleslaw too. Not posh coleslaw, not even an exotic Asian-ish one. Is there such a thing as a middle class coleslaw? I think I've just made it. But in good news, this is a coleslaw that transcends all barriers. Young, old, rich, poor, we can all eat and enjoy with impunity. But if you even think of putting tinned pineapple in it you deserve to choke on each mouthful.

So good to eat, so hard to make look good to eat!
Middle class coleslaw
This is the sort of thing you whip up in 10 minutes while wearing your running kit and making increasingly firm requests to your daughter to get out of the bath so you can get into it. Quantities are approximate - this much makes enough for four. Any leftovers are good in a lunchbox the next day.

1/4 of a cabbage - Savoy if you're posh, ordinary if not, shredded
2 carrots, peeled, then grated
2 ribs of celery, destringed, then finely chopped
100g tasty cheddar, grated
1 tsp caraway seeds (optional)

For the dressing:
1 clove garlic, mashed to a paste with a pinch of salt
2 tsp Dijon mustard
a good pinch of sugar
4 Tbsp apple cider vinegar
8 Tbsp extra virgin olive oil

Make the dressing first. Put the smashed garlic, mustard, sugar and vinegar in a screw top jar. Screw on the lid and shake well. Add the oil, reattach the lid and shake again until emulsified. Taste - add a little more oil or vinegar to suit. It should be slightly on the sharp side to balance out the cheese.
Put the cabbage, carrot, celery and cheese in a salad bowl and toss together to mix. Sprinkle over the caraway seeds, if using, then pour over two-thirds of the dressing. Toss well, adding more dressing if necessary. Serve immediately or cover and refrigerate until needed.

Are you a food snob? Does it get you into trouble?

Tuesday, June 11, 2013

Random recipe: Shiraz bi buqal

Regular readers of Belleau Kitchen will know that the proprietor, Dom, has been unwell recently. Rather than let a bout of illness put him off the boil, he's gone and given this month's Random Recipe challenge a 'happy and healthy' theme, extolling participants to rummage through their diet or health-related cookbooks in order to come up with something nourishing to share.
Given that I don't own any diet books, unless you count Victoria Moore's 'How to Drink' (a sort of guidebook for those who wish to pursue an alcoholic liquids diet), I instead turned to my latest find - a battered paperback called 'Wild Blackberry Cobbler And Other Old-Fashioned Recipes' - that I found at a charity shop for 50 cents. This book, first published in 1985, has recipes from Greek and Roman times through to American dishes of the 18th and 19th centuries. It's written by Katie Stewart, one-time 'cookery editor' of The Times and it's a brilliant read.
I wasn't sure a random flick through would turn up anything that Dom would consider 'happy and healthy', but I was wrong. According to Katie Stewart, the old Persian recipe from which this dish comes described it as "an excellent relish which both awakens and stimulates the appetite". If that's not happy and healthy, I'm not sure what is.


Shiraz bi buqal
You have to admit, 'shiraz bi buqal' sounds a bit more exotic than plain old 'cottage cheese with fresh herbs' - and whatever you might think of cottage cheese, it sounds more enticing than the ancient Persian equivalent of 'coagulated milk'. It's all in how you describe it, isn't it? So this then, is a mix of fresh, onion-y leeks and celery, fragrant mint, crunchy nuts and soft curds. It's good on a slice of hearty bread or with some decent crackers and perhaps a dried fig or two.

250g cottage cheese (the best sort you can get, and most emphatically NOT the 'lite' version
3 thick slices of the white part of a leek
a handful of celery leaves
6 mint leaves
1/4 tsp dry mustard powder
salt and pepper
12 walnut halves, roughly chopped

Finely chop the leek, celery leaves and mint leaves together - if you have a processor with a mini-bowl, now is one of the rare times it comes in handy. Stir into the cottage cheese with the mustard and salt and pepper. Pile this mixture into a small serving bowl and top with the walnuts. Serves two as a lunch accompaniment or four as part of a platter of delectable titbits.


Tuesday, April 23, 2013

Random recipe: Feta + radish salad

I'm always amused at the ways Dom of Belleau Kitchen comes up with to entice people into joining his Random Recipes challenge each month. For April he's decided to enlist the help of an interactive 'thingummydoodah' to make the process simpler (because nothing is more tedious - or frightening - than counting your cookbooks, right?)

For once the gods of Random Recipes smiled upon me and the thingummydoodah chose Fiona Beckett's Cheese Course. There are no prizes for guessing the focus of this lovely book, which looks at wine and cheese matching (or whisky and cheese matching, if that's your thing), designing cheese boards and choosing cheeses for entertaining, along with a generous handful of recipes.

 It's not exactly spring in New Zealand at the moment (though it is unseasonably warm and it is definitely raining a lot) so I was really hopeful that the book would fall open at Fiona's delicious macaroni cheese recipe (with crispy wafers of Parmesan scattered throughout so no one misses out on the crunchy bits). But as we eat a lot of feta, cucumber and olives in our house, landing on this recipe was surely a sign from the cheese gods.


Feta, cucumber and mint spring salad
Fiona says this recipe comes from London restaurant Ransome's Dock, which in turn adapted it from a dish at Zuni Cafe in San Francisco. She's given me her kind permission to reproduce it here. Don't quote me on this but if you're on Dr Michael Mosley's 5:2 diet, it strikes me that this salad offers quite a lot of bang for your calorie buck.

2 mini cucumbers (or about half a telegraph cucumber)
6 radishes
2 handfuls of rocket
a small handful of fresh mint leaves, finely sliced
150g feta, broken into small pieces
10-15 small black olives

Dressing:
3 Tbsp extra virgin olive oil
1 Tbsp red wine vinegar
a squeeze of lemon juice
sea salt and freshly ground black pepper

To make the dressing, put all ingredients in a lidded jar and shake until well combined.
Cut the cucumbers in half lengthways and scoop out the seeds with the tip of a teaspoon. Slice lengthways, using a mandoline or vegetable peeler, until you have a pile of wafer-thin slices. Slice the radishes thinly on the diagonal.
Put the cucumber, radishes, mint and rocket in a bowl and toss together with the dressing. Add the feta and toss lightly again, then scatter over the olives. Divide the salad between two plates and serve with crusty bread. Serves two as a light lunch.

Monday, April 15, 2013

Smoked salmon and wasabi pate

The man of the house is currently brushing up on his French skills and this means getting me to help him with his homework. Once upon a time, this would have been easy, but the passing of time means my brain doesn't operate in French as well as it used to (or, indeed, as I imagined it once did). I've been feeling quite depressed about this, but am consoling myself with the fact that my menu French is still better than his. And when I looked up the Larousse to get a proper dictionary definition of 'pate', I didn't need another dictionary to explain the answer. So I can't be too badly off, can I?

Smoked Salmon And Wasabi Dip

Smoked salmon and wasabi pate
For the record, Larousse defines 'pate' as 'preparation de charcuterie de texture tres variable et composee de viandes et d'abats en morceaux ou en pate fine et de differents ingredients' and you don't need to know much French to figure out that there are (mercifully) no 'viandes' (or 'abats' - organs) in a smoked salmon version. But I had to call it something other than 'a sort of spread-y thing you can have on toast or crackers or on little bits of cucumber like an 80s canape', didn't I?
This is inspired by something in Jamie Oliver's book on British food - he makes something similar with smoked trout and horseradish and serves it with baby Yorkshire puddings. And cor blimey, guv'nor, it is bloomin' lovely. Or c'est absolument delicieux, as our French friends would say.

150g cream cheese, softened
1/4 - 1 tsp wasabi paste
150g hot smoked salmon
finely grated zest of a lemon, plus its juice
a couple of teaspoons of finely chopped dill or mint

Put the cream cheese, lemon zest and 1/4 teaspoon of wasabi in a small bowl and beat with a fork until smooth. Taste it for hotness - the wasabi should be present, but not overpowering. Keep adding it until you think it's about right. Flake in the hot smoked salmon and dill or mint. Fold it into the cream cheese, adding a little lemon juice if it seems a bit stiff. Taste again for seasoning - add some salt and freshly cracked black pepper until the balance is right. Scrape into a little bowl and cover, then store in the fridge. Makes enough for six people as a canape, with enough for one lucky person to have on toast the next morning.

Bonne semaine, tout le monde!

Monday, February 25, 2013

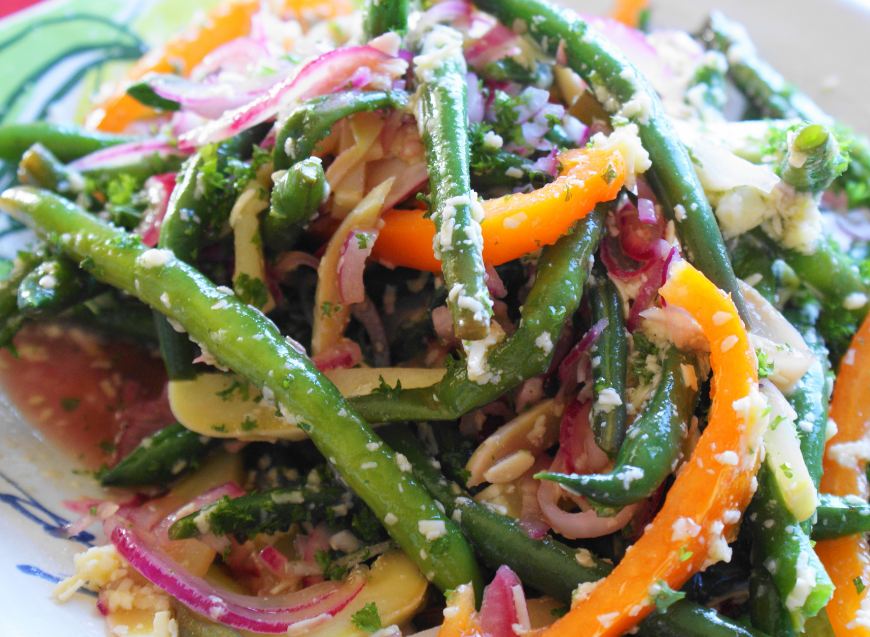
Random recipe #25: Bermuda Salad

I felt very old last week. First, I saw a group of new university students moving into their hostel accommodation and realised I looked like one of their mothers. Second, I got out of bed and put my neck out. Third, I saw several copies of Mollie Katzen's Moosewood Cookbook in charity shops.

She was more hippy than hipster, but Mollie Katzen ruled the vegetarian school of eating in the late 1970s and 80s. She was part of a collective (it was the 70s, remember?) who ran a restaurant in Ithaca, New York devoted to good, wholesome food. The hand-lettered Moosewood Cookbook, first published in 1973, reflected that ethos (instead of a table of contents it has a 'table of contentment') and went on to become one of the 10 best-selling cookbooks of all time, according to the New York Times. The food, though a little dated in parts, is not unlike that in Ottolenghi's Plenty, so if you see a copy in a charity shop, snap it up.


Moosewood Bermuda Salad
All that said, I felt a bit nervous when my hand fell on the book's cracked spine when I was searching for a contender for February's Random Recipe challenge. I thought of some of the book's less appealing recipes, like Stuffed Cabbage or White Rabbit Salad (cottage cheese, apples, seeds) and wondered how I would sell those to my dining companions. In the end though, the benign gods of Random Recipes - or at least the beatific Dom of Belleau Kitchen - smiled upon me and we ended up with this gem. It looks a bit messy, but it tastes delicious. Don't tell Mollie's crew but we ate it with a roast chicken and it was a very happy match.

125ml apple cider vinegar
1/2 tsp salt
lots of freshly ground black pepper
2 cloves of garlic, crushed
125ml extra virgin olive oil
500g green beans, topped and tailed
2 red onions, thinly sliced
1 cup grated cheese
two handfuls fresh parsley, finely chopped

Put the vinegar, salt and pepper and garlic in a large bowl (the serving bowl, to cut down on dishes) and stir well. Whisk in the olive oil. Add the sliced onion and set aside.
Steam the beans until just tender. Drain, then add to the marinade. Stir well and let cool, then cover and refrigerate for at least three hours before serving.
Ten minutes before you're ready to eat, take the salad out of the fridge. Toss through the parsley and grated cheese just before serving. Serves four.

The instructions in the book are very explicit: "This is a COLOR SALAD. Don't substitute white onions or cheese or you'll lose the scheme. Okay?" You're also supposed to serve it on a bed of red cabbage leaves for added wow factor. I didn't. As for the cheese, the book specifies colby (ugh!) but we used tasty cheddar. Feta or Parmesan would be good too. The final instruction is to "Garnish Lavishly" with eggs, tomatoes, olives, sprouts, lemon slices or orange slices. You can take a book out of the 1970s, but you can't take the 1970s out of the book.

Do you have the Moosewood Cookbook? Do you still use it?

Wednesday, January 09, 2013

Parmigiano and prosciutto

This might sound strange, given I earn my living by tapping away at a keyboard, but one of my resolutions for 2013 is to spend less time online. It's so easy now to get caught in the interweb that some days I feel I spend more time interacting with virtual life than the real thing. That doesn't mean I'll be giving up entirely - I mean, I have this blog to feed, delectable things like this to marvel at and a shoe habit to maintain - but I want to spend more time doing things that don't require a broadband connection. Pottering about in the kitchen with friends over the holidays was a good reminder of the benefits of actual reality.


Parmigiano e prosciutto alla Bess
This was one of the things lovely Bess whipped up for our New Year's Eve feast. Her brother, a chef who divides his time between Martha's Vineyard and New Zealand, taught it to her and in an ideal world, I'd be at your place making it for you. Instead, invite someone over to your place and show them how to make it.

a small block of Parmigiano Reggiano (or best local equivalent)
a packet of prosciutto (or best local equivalent)
extra virgin olive oil (I have been using this delicious fennel-infused Wairarapa oil)

Lay the slices of prosciutto on a flat plate. Grate over the cheese, then drizzle with the oil. Serve with glasses of prosecco (or best local equivalent). Cheers!

What foodie trick have you learned in 'real life' lately?

Monday, December 10, 2012

Gougeres that will make you talk

One of the things I love about the Boy Wonder is his gregariousness. In his gung-ho reporter days he'd winkle stories out of anyone - if they were bad eggs it was often to their regret - and I used to give him a stern talking-to before we went anywhere so he wouldn't accidentally-on-purpose interrogate my friends.
"I can't help it," he'd say. "People just tell me things."

If he's not making people divulge their life story, he's probably telling them to come over for a drink. At times last summer I felt like we were running a bar and I was a short order canape maker. I came across these photos the other day and remembered churning out lots of these little cheesy puffs. I think I'm just about ready to make them again.


Gougeres
I've made these for years in all sorts of places, some better equipped than others. While beating the mixture in a food processor does make it a bit easier, I think the hassle of washing all the parts afterwards is hardly worth it. Equip yourself with a sturdy wooden spoon and go to it. Line the tray with baking paper and you'll only have one pot to wash. 
Gougeres are orginally from Burgundy and if you're doing them the proper French way you should use gruyere. But I say, use whatever cheese comes to hand. No one will complain, trust me.

1 cup (250ml) water
50g butter
1/2 tsp salt
1 cup (155g) flour
3 eggs
3/4 cup grated cheese

Heat the oven to 210C and line a tray with nonstick baking paper. 
Put the butter, water and salt in a large pot and bring to the boil. When the butter has melted, tip in the flour and stir well. Turn down the heat and keep stirring until the dough forms a ball. Keep stirring this ball around the pot for about another minute, then remove from the heat and add one of the eggs. Beat like fury until it is all amalgamated, then repeat with the remaining eggs, one at a time. When the mixture is smooth and shiny, beat in the cheese.
Scrape spoonful-sized heaps onto the baking tray. Bake for 10-15 minutes, until the gougeres are golden and puffed up. Eat immediately with a glass of something cold.

Do you have a favourite recipe for what Nigella calls 'unhappy hour'?


Monday, September 10, 2012

Secret cheese and onion bread

Next time I plan to spend the weekend in the garden I'm going to check the weather forecast first. For instead of sitting on the back steps thinking about doing some weeding, I spent both days indoors, worried that either our roof was going to lift off or the windows were going to blow out.
The one good thing about being housebound was that I transformed a few basic ingredients into a magic loaf of bread. Who needs gardening, anyway?

Recipe-For-Cheese-Stuffed-Bread

Secret cheese and onion bread
This magic loaf and its secret molten centre is inspired by Lora at CakeDuchess and her TwelveLoaves project with Jamie at Life's A Feast and Barbara at Creative Culinary.
I've also used some of the principles I learned last weekend with Dean in making the dough, which are easy to do but slightly difficult to explain. There's a very short video that shows how easy it is to knead this way.

500g strong or high-grade flour
1 1/2 tsp dried yeast
1 1/2 tsp salt
2 Tbsp olive oil
320ml warm water
2 onions, finely sliced
1 tsp brown sugar
olive oil for brushing
120g cheese, sliced into pieces about 2cm x 1cm x 0.25cm thick
4 Tbsp good chutney (I use this recipe, or if you are buying it, this one is amazing)
1 egg, beaten
salt and pepper

Put the flour and yeast in a large bowl and stir well, then add the salt and stir again. Make a well in the centre and add the oil and water. Mix well with your hand until a soft, sticky dough forms. Tip this out onto the bench. Pick up one side of the dough, stretch it up, then bring it down again on top of itself. Repeat from the opposite corner.
Do this another three times, then scrape the dough from your hands and walk away. Seriously. Leave the dough to rest for five minutes, then come back and repeat the pick up and stretch process again. Then leave it again for five minutes. Do this process twice more, then scoop the dough into a well-oiled large bowl. Cover with plastic wrap and leave in a warm place for an hour or so, or until doubled.


While the dough is rising, cook the sliced onions in a tablespoon of olive oil over low heat, stirring occasionally. When they are soft, turn the heat up a little and sprinkle over a teaspoon of brown sugar. Let caramelise for another five minutes, then set aside to cool.

Cheese-And-Onion-Bread

When the dough has risen, tip it out onto a lightly floured bench and roll out until it measures about 30cm x 40cm. Cut in half lengthways. Brush one side of each strip with olive oil, then spread the other side with chutney. Layer the cooked onions and cheese on top, then season well with salt and pepper. Fold each strip in half lengthways again to enclose the filling and press down to seal. Pick up the end of the folded strip and concertina it - as if you are folding a piece of ribbon so you end up with a square pile. Repeat with the other strip. Pack both gently into a large, well-greased loaf tin.
Cover the tin loosely with plastic and set aside in a warm place for 30 minutes.
Heat the oven to 200C. Brush the loaf with the beaten egg, then bake for 35 minutes, until well-risen and golden. Carefully tip out of the tin and let cool for at least 10 minutes before slicing.

Wednesday, July 25, 2012

Bake Club: Savoury Scones

Last week I had a rush of blood to the head and encouraged my workmates to make up a team for Wellington On A Plate's Bake Club contest. "It'll be great," I told them. "Of course you can do it."

As we unveiled our savoury scones for the first challenge on Monday, I realised they had all been bluffing about their baking skills and I am a serious contender for the wooden spoon.
This will be a bad look professionally - I mean, I look at recipes all day for work (well, some of the day) - three of the others are hotshot reporters, one is the building's receptionist (and she bakes professionally) and the other is an entertainment editor - who won with some super-spicy beer and sausage scones. So while I took the moral high ground and didn't vote for my own triple cheese scones on Monday, next week I'm going to play dirty.


Triple cheese and salami scones
This is a really easy way to make scones because there's no rubbing in of butter (which is helpful when you're making them before work). One of the rules of Bake Club is to include as many 'Wellington' ingredients as possible. I used Zany Zeus feta (made in Lower Hutt), and Little Wolf salami (from Wainuiomata), but you can use whatever you like. This makes a huge amount, but they freeze well. Oh, and since you ask, I got third. Out of six. Please don't let that put you off, I still reckon these are prize-winners.

4 cups self-raising flour
4 tsp baking powder
1/2 tsp salt
1 tsp mustard powder
3 cups grated cheese - crumbled feta, parmesan, cheddar, plus about 1/2 -1 cup grated cheddar to sprinkle on the top
200g salami, diced      
125ml cream
500ml milk
      
Preheat oven to 220C and put the oven tray in to heat up.
Sift the dry ingredients together in a large bowl. Toss through the cheese and salami.
Mix the milk and cream together in a jug, then pour into the dry ingredients. Fold together until just mixed, then turn out onto a floured work surface and form into a shape about 2.5cm high. Stamp out rounds or cut into wedges.
Transfer gently onto the hot tray and sprinkle with the reserved cheese. Grind over some black pepper and bake for 10-15 minutes, until risen and golden on top.

Are you taking part in Bake Club this year?

Friday, April 27, 2012

Sweet sweet Friday: Chocolate Swirl Cake

I have always, always wanted to make this cake. Well, maybe not always, but at least since 2004, when it graced the front cover of Julie Le Clerc's Feast @ home. It's a blessed union of chocolate, cream cheese, butter and eggs and I have thought about making it for years, even when my copy of the book was 12,000 miles away in a box in my brother's shed. Especially then, in fact.
Now, with the remains of it wrapped in tinfoil in the fridge, I can't wait to make it again. Once you've made it, you'll feel the same way.


Chocolate Swirl Sliver Cake
It took the April edition of We Should Cocoa, hosted by Choclette, to prompt me to dig out Feast @ Home (which naturally fell open to the page the cake is on). Julie Le Clerc says eating it will "remain with you as one of those 'died and gone to heaven' experiences", which is true. She also says to serve it in small slivers, as it is very rich. This is also true, but in our house at least we have found that one small sliver is not as good as two. Or three. Julie also says it serves 16, but at the moment it is serving two very greedy adults (one of whom claims not to like cream cheese in anything) perfectly nicely and neither of us are interested in sharing it.

250g cream cheese, at room temperature
2/3 cup caster sugar
1 large egg, at room temperature
1tsp pure vanilla extract

150g butter
300g good quality dark chocolate (I used Whittakers 72% Dark Ghana)
3 large eggs, at room temperature
1/3 cup sugar
1Tbsp strong coffee, cooled
pinch of salt

Preheat oven to 150C fan bake. Grease and line a 22cm springform cake tin (Julie says some people find it overflows a 22cm tin, but it was fine for me).
Put the cream cheese and sugar in a bowl and beat with an electric mixer until smooth. Add the egg and vanilla and beat to combine, then set aside.
Melt the chocolate and butter together, either in the oven as it heats up (the way I always do it), in a double boiler or in the microwave. Set aside to cool slightly.
Place the eggs, sugar, coffee and salt in another bowl and whisk with an electric mixer for five minutes, or until very thick and pale. Gradually add the melted chocolate and butter mixture while continuing to whisk until combined.
Pour this batter into the prepared cake tin. Dollop big spoonfuls of the cream cheese mixture on top. Push a blunt knife or small spatula into the mixture and swirl around to marble it (this is good fun). Knock the tin with your hand to settle the mixtures, then bake for 40-45 minutes untila skewer inserted comes out sticky but not liquid coated. Leave to cool completely in the tin before serving.

Recipe from Feast @ Home (Penguin NZ, 2004) reproduced with the kind permission of Julie Le Clerc.

Have a great weekend, everyone - see you for some non-baking-related fun next week!

Wednesday, November 23, 2011

Kitchen DIY: Ricotta

When I was a child there was a popular T-shirt for sale in tourist shops, emblazoned with a slogan about New Zealand being a place with three million people and 70 million sheep. I think it was the 1980s version of the fake New Zealand tourism posters in Murray's office in Flight of the Conchords ("New Zealand: your mum would like it" etc).Anyway, while the human population has grown to four million, the sheep have dwindled to 32 million. Dairy farms now rule the roost, with around six million cows dotting the landscape.

Rush hour (image via here)
Rather than making New Zealand the land of milk and honey, intensive dairy farming is blamed for fouling our waterways and having a serious impact on soil quality. As if that wasn't bad enough, market forces mean dairy products are ridiculously expensive, organic or not.
But let me step off my soapbox for a minute and show you my latest favourite trick, DIY ricotta. I don't have the patience or the extreme attention to hygenic detail to make my own proper cheeses, but ricotta is a cinch.

DIY Ricotta
I found this recipe through Twitter, but I can't now really recall exactly where it came from. I wrote it down on a Post-it in shorthand (see, being a journalist can be useful occasionally) and promptly lost the link. Proper ricotta is made from the whey byproduct of other cheesemaking, but this is the cheat's version. Milk thermometers are easily found at kitchen shops (Wellingtonians: buy them upstairs at Moore Wilsons).

1 litre full fat, not homogenised milk
125ml cream
2Tbsp lemon juice or white vinegar
pinch of salt

Put all ingredients into a large and very clean pot. Heat slowly, stirring often, to 96deg C (205degF - which might be easier to see on your thermometer). Take off the heat and let rest for 15 minutes. While that's happening, line a sieve with clean muslin (or a new Chux cloth) and set it over a deep bowl. Pour the curd-y mixture into this and let the whey drain away.
At this point, you can eat the ricotta warm, drizzled with honey, or you can let it drain in the fridge overnight, covered. Makes about 200g.

Have you ventured into the whole of cheesemaking?