Showing posts with label Wellington. Show all posts

Wednesday, June 21, 2017

Black garlic chocolate mousse

If I was the sort of person who did things by the book, I’d be planting my garlic today. But after the failure of last year’s crop – I’ll never know if it was too much rain at the wrong time, the wrong sort of compost, or just bad luck – I’m a bit reluctant. Serves me right for being so smug and getting it in on time last year, I suppose. Traditional garden lore says it should be planted on the Shortest Day, but apparently it can be planted any time from May until the end of July. That’s especially useful information for people like me, who don’t fancy going out in the dark tonight to get the job done.

In the meantime, I’m indulging in some extremely moreish black garlic grown and cured in Marlborough. Black garlic, or ‘garlic noir’ as it’s sometimes called, is fermented for a month to create a kind of super garlic that has double the antioxidants of the ordinary stuff. The fermentation process also changes the texture and flavour profile – black garlic is soft and almost chewy, with a sweet and smoky flavour that reminds me of molasses or fresh dates. It’s extremely moreish and I often find I have eaten a couple of cloves while slicing it up for something else.


 The clever people who make it at Marlborough Garlic suggest using it as part of an antipasto platter, but I’ve also been adding it to vinaigrettes, or adding it as a last-minute flavour boost to risotto, as it doesn't need to be cooked. They also suggest dipping in in dark chocolate, which I was unsure about until a recent lunch at the sublime Wharekauhau Lodge where pastry chef Yannick Beaurienne devised a gorgeous black garlic chocolate mousse with kumara and pear brunoise, kumara ice cream and garlic caramel, as seen below.


Yannick's version was beautiful, elegant (and extremely labour-intensive). Here’s my much-simplified version for the home cook.


Black garlic chocolate mousse with black garlic toffee
Don’t be afraid – the black garlic just deepens and enriches the chocolate flavours. This was a huge hit in my household, to the point that there was barely any left to photograph.

For the mousse:
200g dark chocolate
2 cloves black garlic (about 8g)
400ml cream
1/2 tsp pure vanilla extract

For the black garlic toffee:
3-4 cloves black garlic, finely sliced
4 Tbsp caster sugar
20ml (4 tsp) water

A little extra cream, for drizzling

Break the chocolate into pieces and put into a heatproof bowl. Put half the cream into a small pot and heat to nearly boiling point. Pour over the chocolate and set aside for five minutes.
Mash the garlic to a paste and stir through the chocolate and cream until the mixture is smooth.
Whip the cream and vanilla to soft peaks. Fold through the cooled chocolate mixture,  then pour into a large bowl or divide between six small serving dishes (I use Great Aunt Shirley’s whisky glasses). Cover and put in the fridge to set for at least two hours.

For the toffee, spread the sliced garlic on a piece of non-stick foil or baking paper. Put the sugar and water in a small pot and set over medium heat. Stir to dissolve the sugar, then let it bubble away for five to 10 minutes, until it turns a dark golden colour (don’t wander off, this will happen sooner than you think!) Pour the toffee over the garlic and leave to set.

To serve, remove the mousses from the fridge at least 20 minutes before serving. Break the toffee into pieces and use to decorate each one. Drizzle a little cream over the top and serve.

Are you planting garlic this winter? Do you have any top tips for failed growers?

Wednesday, June 14, 2017

Frozen persimmon sorbet

Have you been struck by the dreaded winter lurgy yet? It has cut a swathe through our small household in the last week and I don't think it's done with us yet. I lost my voice over the weekend, then lost my hearing as soon as it came back. Worst of all, I've lost my sense of taste - unless it's chocolate or chilli, I've been reduced to eating for texture only. This is profoundly depressing.

I'm hoping that my current high levels of persimmon consumption will speed my recovery. Persimmons are high in vitamin C and look extremely cheerful in the kitchen. Oranges are not the only fruit at this time of year, after all.


This week's Three Ways With... column is devoted to the not-so-humble persimmon, which I have been consuming in huge quantities lately (so imagine how much sicker I could have been!) The following recipe for frozen persimmon sorbet will be extremely soothing if you're unwell, but you don't have to be poorly to enjoy it. 

Frozen persimmon sorbet
I was extremely sceptical when I read about this recipe - and I did have to experiment with it a bit to make it work - but it's a nice bit of fun to try (with minimal effort required). All you need to do is freeze as many persimmons as you have diners for a minimum of three hours. At least 45 minutes before serving, remove the persimmons from the freezer. Slice off the tops and let the fruit sit at room temperature. After 45 minutes they will be icy cold, but soft enough to spoon out the frosty flesh. For an extra treat, pass around a bowl of whipped cream.

If this sounds like too much hassle, be reliably informed that you can freeze peeled, sliced persimmons and whiz them up in smoothies. And if you have a dehydrator, dried persimmon slices are absolute heaven (thanks Ann for the lovely specimens below).


Wednesday, May 31, 2017

Kitchen DIY: Goats' curd

Q: What do you call a goat that's sitting around doing nothing?

A: Billy Idol.

I'm sorry, I couldn't resist. I fell down a rabbit hole of goat memes on the internet the other day and bad goat jokes were rife. Believe it or not, the Billy Idol example was one of the better ones.

Goats have been on my mind because today's Three Ways With... column is all about using goat meat, milk and cheese. The latter has become much more common in New Zealand in recent years -there were loads of great goats' cheese entries in the recent Outstanding Food Producer Awards, for example - but the former two are only just on the cusp of being mainstream. It's a pity, because they're delicious - and they tick all the boxes in terms of careful production and quality.


I was inspired to make my own cajeta (pictured above) after tasting Hamilton company Cilantro's version. Making your own is fun, not difficult and yields a generous amount that will disappear quickly. It's the closest thing I've tasted to manjar, the highly addictive Chilean dulce de leche. One spoonful and you'll never be satisfied with salted caramel again.

If you're too pure to sully your palate with such decadence, but want to have a play with goats' milk in the kitchen, I strongly recommend DIY goats' curd. I make it quite often (short-dated goats' milk is often on special at my local food emporium) and it's the sort of kitchen magic trick everyone should know how to perform.


DIY Goats' Curd
This is about as simple as cooking gets - milk + heat + coagulant + time = soft, creamy goats' cheese. Smoosh a bit on some toasted baguette, drizzle over some extra virgin olive oil and bliss will be yours.

500ml (2 cups) goats' milk
3 Tbsp freshly squeezed lemon juice
a pinch of salt

Heat the goats' milk until simmering point. Remove from the heat and stir in the lemon juice. Let sit for 10-15 minutes, until curds have begun to form. While you're waiting, line a sieve with muslin (I use a very fine cotton table napkin) and set it over a large bowl.
Carefully pour the curds/milk into the sieve. Leave to drain for at least 20 minutes, pressing it gently to squeeze out the whey. If you're not in a hurry, you can put the sieve/bowl arrangement in the fridge and let it drain for a couple of hours.
When you're ready, scrape the curds into a small bowl. Use immediately or cover and store in the fridge.

Are you a fan of goats' produce? Or do you have a good goat joke to share? Let me know!

Friday, February 03, 2017

Ice cream daze

I don't want to be a weather bore, but Wellington is having the most dismal summer ever. I mean, really. On Monday I was so cold at work I had to borrow a jacket destined for the lost property box. On Tuesday I ended up buying a winter coat. On Wednesday I wore it. Yesterday it rained so hard I had to wring my wet clothes out when I got home - and that was after sitting in the car for AN HOUR because the weather wreaked havoc on the traffic. Harrumph.

Tangelo and cinnamon sorbet. Yum!
But today the sun has come out and it seems like the long weekend might even be fine. Ish. Which means it might be more appropriate to tell you about the Three Ways With Frozen Treats column I wrote two weeks ago. Here it is, for your reading pleasure. Bonus points if you can identify the model in the photo.

Have a great weekend, everyone. May the sun shine on you, wherever you are!

Thursday, January 19, 2017

Three ways with... picnic food

There's a long weekend on the horizon and - though the weather is unlikely to be playing ball - I'm still hopeful that there will be enough sunshine for a picnic.

Photo: Ross Giblin/Fairfax Media
This week's Three Ways With... has a trio of picnic-friendly recipes for you to try. If all else fails, eat them while sitting on a picnic blanket in the lounge. Add lashings of ginger beer and some spy-catching for a frisson of Famous Five-style fun.

Happy weekend!

Monday, April 11, 2016

The perfect tuna sandwich

No blog posts for ages and then, what? A sandwich? I'm afraid so. Truth is, I feel like I've lost my food mojo in the last couple of weeks. Life seems to have overtaken me; there seems to be too much going on and not enough time to do it in. I've been doing a lot of running, so I'm perpetually hungry (and tired), and spending hours in the kitchen is a luxury I don't seem to have. 

Anyway, I'm hoping normal(ish) service will resume soon. In the meantime, here's a sandwich I perfected earlier in the year, when I was on holiday, combining lots of running with lots of gardening, lots of reading and lots of sitting on our newly finished deck, thinking how life was pretty sweet.


The perfect tuna sandwich
Not surprisingly, good tuna and good bread are essential to the success of this sandwich. The absolute best baguettes I've found in Wellington are the Acme sourdough baguettes from Prefab, the best tuna is the Sirena brand (the one with the mermaid on the tin).

1 x 185g tin good quality tuna in oil, drained (reserve the oil)
2 tsp green peppercorns in brine, drained
2 tsp capers, rinsed and roughly chopped
zest and juice of a lemon
2 tbsp mayonnaise
salt and pepper

Put everything in a small bowl and mix well. Add a little more oil if necessary. Pile into a halved baguette with some crunchy lettuce. Eat immediately.

What have you been up to while I've been away?


Tuesday, February 02, 2016

Lemon verbena syrup + an elegant fruit salad

Four years ago, not long after my mother died, someone I didn't know very well left a lemon verbena tree on our doorstep. I found this gesture incredibly touching and kind, not least because my parents' garden had a huge lemon verbena tree and Mum often made tea from the leaves. I'm not sure if I ever properly thanked her - but Kate, if you're reading this, I often think of that kindness when I walk past the tree.


The tree has thrived, despite my neglect, but I seldom do anything with the leaves except for the occasional cup of tea. Then, while pottering around in the kitchen a week or so ago, I made this syrup and the whole house smelled like lemon verbena. It was gorgeous.

If you've got a lemon verbena tree, make this syrup now to get a dose of that intense lemony sherbet flavour in the depths of winter (or scent your house with it in summer). You can use it in drinks (nice with soda, or with very cold vodka as a kind of martini-ish number), or pour it over vanilla ice cream, or use it in this simple and elegant fruit salad (recipe follows). I'm thinking a lemon verbena sorbet could be next...

Lemon Verbena Syrup

1/2 cup boiling water
1/2 cup caster sugar
1 packed cup lemon verbena leaves

Put the water and sugar in a small pot and set over medium heat. Stir until the sugar has dissolved, then lower the heat and add the lemon verbena. Let bubble gently for five minutes, then remove from the heat and leave to cool.
When the syrup has cooled completely, strain it through a fine sieve into a sterilised bottle or jar. Discard the lemon verbena leaves or use them as a garnish (they will be almost candied). Makes about 1/2 cup.

Simple fruit salad with lemon verbena syrup
2 white-flesh peaches
2 apricots
2 dark-fleshed plums
1 1/2 cups blueberries (or boysenberries)
1/4 cup lemon verbena syrup

Cut all the stonefruit into slim wedges - about eight slices - and put in a bowl. Pour over the syrup and stir gently, then add the berries. This can be done in advance, but I think it's nicest at room temperature rather than fridge-cold. Serves 4-6.


Monday, January 25, 2016

Paua with garlic, chilli, coriander and lime

We are blessed with the best neighbours in the world. They are great neighbours for all sorts of reasons, but for the purposes of a food blog, they are the best neighbours because they do things like turn up with freshly caught crayfish, or duck, or smoked trout. Now they've just set the bar even higher by bringing us three massive paua. It's going to take a lot of reciprocal bottles of wine and cakes to beat that one.

Paua With Garlic, Chilli, Coriander And Lime

I can't remember the last time I had fresh paua - it appears in dishes on restaurant menus sometimes but my sources tell me it's usually squid, so I never order it. When I was 13 I remember a magical holiday with cousins in the Far North of New Zealand, where the crayfish and paua were in such abundance we begged to have sausages as a treat. If you happen to have excellent neighbours, or a source of paua, here's a way to cook it.

Fast And Easy Paua With Asian Flavours

Paua with garlic, chilli, coriander and lime
Paua is notoriously tough - I remember my cousin beating it with a wine bottle to tenderise it - but my neighbour passed on the 'boil it first' method, which works well (and requires a lot less effort). Quantities here are very approximate - adjust to suit the amount of paua you have. If all else fails, do what the restaurants do and use squid instead.

Half-fill a pot with water and bring to the boil. Drop in the paua and cover the pot. Let the water come to the boil and simmer for three minutes. Drain immediately and slice the paua into thin strips.
Heat a couple of sloshes of olive oil in a large, heavy frying pan. Add a couple of cloves of garlic, sliced, some fresh chilli and a bunch of spring onions. Add the paua and cook, stirring frequently, for another couple of minutes.
Scoop onto a warm waiting plate, then squeeze over some fresh lime juice and strew with coriander. Eat immediately.

Monday, August 17, 2015

Pork osso bucco with apples and silverbeet

Whenever I go to the supermarket I take great delight in trying to circumvent all those tricks they use to try to make you buy things you didn't know you needed. I'm not very successful though, which is how I ended up with two packets of pork osso bucco and a huge bunch of silverbeet when I nipped into Moore Wilson's on Sunday morning to buy some fish.

Here's what I did with it...


Pork osso bucco with apples and chard
This requires a maximum of 15 minutes of concentration and chopping at the start, then you can wander away to do its thing unattended in the oven for a couple of hours. Obviously that means it's not the sort of thing you start making after work, but if you make it on a Sunday it can then wait patiently in the fridge for you to eat on Monday. And I don't know about you, but coming home on Monday night knowing that dinner is already cooked is the most wonderful feeling in the world.

2 Tbsp olive oil
2 onions, finely chopped
2 cloves garlic, finely sliced
1 cup celery (leaves and ribs), finely chopped
1 tsp fennel seeds
1.2kg pork osso bucco
1 cup white wine
1 cup water
2 large apples, cored and sliced
1 bunch Swiss chard, finely chopped (including stems)
salt and pepper

Heat the oven to 150C.
Heat one tablespoon of the oil in a large, heavy, ovenproof pot. Add the onions, garlic and celery along with a pinch of salt and the fennel seeds. Cover and cook for 5-10 minutes, until the vegetables are soft and beginning to brown.
Remove the vegetables from the pot with a slotted spoon, then return it to the heat and add the remaining tablespoon of oil. Brown the pieces of pork on all sides (you may have to do this in batches), then return the vegetables to the pot. Pour in the wine and water - careful, it will spit - then layer the apples and silverbeet on top. Season well, then cover and put in the preheated oven.
Cook for two to two and a half hours, or until the meat has falling off the bones. Taste for seasoning and serve with some crusty bread.

Have a great week, everyone.

Sunday, August 09, 2015

Spicy pumpkin, tomato and coconut soup

Earlier this year a Google soup recipe search habits survey found pumpkin soup was the top of the list in New Zealand, for the third year in a row. Are Kiwis creatures of habit, huge consumers of pumpkin, or just really boring? Perhaps it's a combination of all three. While you ponder that, here's my latest pumpkin soup variation (which uses a respectable amount of pumpkin, but isn't remotely boring. I hope.)


Spicy pumpkin, tomato and coconut soup
This is quick, easy and very warming, which means it meets all the criteria for a simple Sunday lunch (with enough leftover for a lucky person to take to work on Monday). Serves 3-4.

1 Tbsp extra virgin olive oil
1 onion, finely chopped
2 cloves garlic, finely sliced
a good pinch of salt
2 tsp garam masala
2 tsp dried chilli flakes
1 kg pumpkin, peeled, seeded and cut into 2cm chunks
1 x 440g can chopped tomatoes
1 x 440ml can coconut milk

Heat the oil in a large, heavy pot and add the onion and garlic. Cook, stirring occasionally, for five minutes, then add the spices and salt. Let cook for another couple of minutes, then tip in the pumpkin. Cover and cook for five minutes, then add the tomatoes. Half-fill the tomato can with water and add to the pot, then cover and cook for another 15 minutes, or until the pumpkin is soft.
Remove from the heat and mash roughly with a potato masher (or use a stick blender, if you like soup to be very smooth) then add the coconut milk. Stir well and return to the heat. Bring to a simmer, then serve immediately.

If this one doesn't take your fancy, try this hands-free pumpkin and chipotle soup.

Have a great week, everyone x

Sunday, July 19, 2015

Creme fraiche and chocolate nut truffles

Last Sunday my sister-in-law turned up on my doorstep with a huge chocolate cake, a tub of Zany Zeus creme fraiche and a jar of Fix and Fogg chocolate peanut butter.


We anointed the cake with dollops of both - such a good activity on a winter Sunday afternoon, sitting around, eating cake with chocolate peanut butter on top - and then they left. "I expect you to do something creative with that peanut butter," she called over her shoulder as they left. "No chance," I said. "I'm just going to eat it out of the jar."

But it turns out there's only so many spoonfuls of chocolate peanut butter and creme fraiche you can eat in a week. Here's what you should do with the rest.

Easy Chocolate Peanut Butter And Creme Fraiche Truffles

Creme fraiche and chocolate nut truffles
If you're not in the habit of having either of the main ingredients lying around, you could always make your own creme fraiche AND make your own salted chocolate nut butter. Then you can whip these up whenever you like, rather than for the rare occasions when you have some going spare.

1/2 cup creme fraiche
1/3 cup chocolate peanut butter
1/4 cup ground almonds
1/2 tsp pure vanilla
1/3 cup finely chopped dark chocolate (about 10 squares of Whittaker's Dark Ghana)
a good pinch of sea salt

For rolling:
2 Tbsp ground almonds
1 Tbsp cocoa, sifted

To make the truffles, put all ingredients in a bowl and beat until well combined.
Mix the second measure of ground almonds and cocoa together in a shallow bowl.
Roll teaspoonfuls of the mixture into small balls, then roll them in the almonds and cocoa. Leave in the fridge to set for 30 minutes before eating. Store, covered, in the fridge. Makes about 22 balls, depending on how much you eat in the process.

Have a great week, everyone!


Monday, June 29, 2015

How to knit an egg cosy (and make fork pompoms)

One of the happiest winters of my life was spent in Whanganui, where my lovely friend Anna and I amused ourselves with sewing, cooking, art projects and soaking in the fire bath in our garden. If it sounds all a bit Little House On The Prairie, that's because it was. The house we rented felt very much like an idyll from the rest of the world, kept warm by the hum of sewing machines and a constantly-boiling kettle.

Life seems to have become a lot less idyllic of late, but I've decided there is still room in my life for little projects.  Especially slightly ridiculous ones as soothing as knitting an egg cosy.

Very Easy Egg Cosy Knitting Pattern For Beginners

Lucy's Easy Egg Cosy
I devised this pattern after knitting my daughter a woolly hat - essentially a rectangle that you draw up at the end. This lacks the absolute charm of a more complicated pattern but it's an excellent confidence booster for amateur knitters. The one in the picture is a little bigger than it's supposed to be - or perhaps I bought shorter than average eggs - but this pattern should make one that's just the right size.

You will need:
8mm knitting needles
Double knitting wool - use up any scraps you have, as long as they're the same ply
Wool needle

Cast on 28 stitches. Knit one row, then purl the next. Continue in this fashion until the work measures 6.5cm, changing colour as your wool supplies allow.
Thread a wool needle (as in, a sewing needle, not a knitting needle) with wool and slip it through the stitches as you slip them off the knitting needle. Gather both ends of this wool together and pull tightly - the knitted work will come together like the opening of a drawstring bag. Knot together tightly.
Carefully turn the egg cosy inside out and stitch the open side together. Trim any loose threads and hey presto, your eggs will never grow cold again. For added style at breakfast time, add a tiny fork pompom on top. Instructions follow below...

How To Make Fork Pompoms

How to make a fork pompom
When I made my daughter's hat, making the fist-sized pompom for the top seemed to take nearly as long as the knitting did (and it used nearly as much wool!)
These tiny pompoms are much faster than the traditional cardboard donut method. All you need to do is to wind the wool around the tines of a fork - I've used a cake fork in the image above - until you have a fat wodge of wool. Slip another piece of wool between the tines and the wrapped bundle, then tie tightly in the middle (I've used a different colour here for display purposes). Slip the tied bundle off the tines, then snip the ends of the pompom as usual. Be careful not to trim it too agressively if it's a very little pompom as it may fall apart.

Have you got a winter project on the go?

Friday, June 05, 2015

The art of writing - workshops at Tea Pea

It's cold, and grey and the news everywhere is bleak. But before you rip open a chocolate bar and sob into your screen, there is a ray of light on the horizon. And you can get involved!

This month sees the start of a series of fun workshops, demonstrations and talks at the lovely Tea Pea School in Khandallah. You can sign up to learn about loads of things, including floral artistry, interior design tricks, cake icing and writing. Yes, writing. I'm particularly excited about that one, because I'll be teaching it.


So, if you long to put pen to paper (or fingers to keyboard) but don’t know where to start, come and join us. The Art Of Writing workshop will help you unearth your inner writer, with tips on connecting with your audience and finding your voice, advice on grammar and construction, how to craft the perfect social media post and more. We might even talk about how to write a recipe, if the need arises.

There will be lots of fun to be had, along with food, drinks and goodie bags. You can find out more about The Art Of Writing workshop and the Tea Pea School here.

Have a great weekend, everyone x

Tuesday, May 19, 2015

Old-fashioned vegetable soup

Did you know that in some places they're not making journalism interns learn shorthand any more? I know, I'm shocked too. Instead of giving them a good grounding in Teeline, they're giving them magic recording pens that download interviews straight to a computer.

I knew the world would pass me by one day but I didn't think it would happen so soon. I hate to think what Mary, my shorthand teacher, would think of this. Mary, a saintly sort, reckoned shorthand was crucial for getting you out of a tight spot. Mary warned against relying on dictaphones for fear they would break down and advised us to always carry a pencil because it would enable us to write in wet conditions. I hate to think what she'd make of a magic pen.

My shorthand isn't what it used to be (ahem, I could do 120 wpm in my heyday), but I still use it all the time. I have recipe notes full of part shorthand, part longhand scrawl and I can still write a shopping list in seconds. Bet fancy youngsters can't do that with magic pens.

To seal my reputation as a past-it hack of no use to anyone, here's a vegetable soup recipe so old-fashioned it's probably due a hipster revival.

Easy Old-Fashioned Vegetable Soup


Old-fashioned vegetable soup
This is so simple you don't need a magic pen or shorthand skills to memorise the recipe. It's very comforting, hearty and cheap to make. Be careful when buying soup mix as some are packed with unnecessary flavourings and salt. If you can't find a decent one (Wellingtonians: Moore Wilson has 500g bags of soup mix that are ideal), then just use a mix of split peas, red lentils and pearl barley.

1 cup (250g) soup mix
4 cups chopped vegetables - eg onion, carrot, celery, sweet potato, pumpkin
8 cups good quality vegetable or chicken stock
fresh herbs - parsley, chervil, coriander

Put the soup mix, vegetables and stock in a large pot. Bring to a simmer, skim off any scum and let cook, uncovered, for about 1 - 1 1/2 hours, until the vegetables are tender. Stir through some fresh herbs before serving. Makes about 10 cups and freezes well.

Tuesday, May 12, 2015

How to fake a wedding cake

This is the wedding cake that nearly wasn't.

Pandoro Black Doris Plum And Mediterranean Orange Wedding Cake

When one of my oldest and dearest friends announced she was getting married, I immediately offered to make the wedding cake. She accepted the offer and that was that.

When their wedding was delayed to May, I breathed a sigh of relief and put the cake on the back burner.

Then all of a sudden it was April, the bride was talking multiple layers, chocolate ganache, and the merits of chocolate mud versus chocolate and fig, I had a million other things on my mind and I was lying awake at night, panicking about The Cake.

It was then I remembered that I'd been in this situation before. Five years ago, with a small baby and ideas above my station, I offered to make the wedding cake for some dear friends who'd blown into New Zealand from London to get married.

"Oh yes please," they said. "Don't go to any trouble, but we'd like it to have three layers and have licorice allsorts exploding out the top."

Making the cakes - one chocolate and fig, one chocolate mud and one banana (the groom's favourite flavour) - was easy. Doing the decorating was not. Not for the first time, I recalled a school report in which my teacher said I was often frustrated when my grand plans for artworks didn't come to fruition. I handed the baby to my mother-in-law and spent 24 hours wrestling with kilos of white fondant icing, alternating between wanting to cry and wanting to cheer.

On the afternoon of the wedding, my beloved and I balanced the cake on our knees while my father-in-law drove as slowly as he could around corners. We screamed every time the cake lurched towards my silk dress, more for the sake of the cake than my outfit. By the time we got to the venue the cake had several dents in it and I needed a strong drink to settle my nerves.

It nearly killed me, but the lovely bride and groom were happy and lots of guests said nice things about the cake. Still, I swore that it was the last time I would ever do it.

With those memories flooding back, I rang the bride. "I can't do it," I told her. "I'm too afraid it will be a disaster and you'll be even more disappointed in me than you feel right now."

Like the good friend she is, she took this news on the chin. Instead of making the cake, I decided to redefine my role as chief cake wrangler. I set about getting cake quotes and set up a wedding cake Pinterest board to gather ideas. When they baulked at the quotes - a two or three tier wedding cake is in the region of $400-$500 - I came up with plan B.

Instead of requesting a wedding cake, I asked Pandoro Bakery to make us two large cakes - one a 14" Black Doris Plum Chocolate, the other a 10" Mediterranean Orange, which they present on gold foil cake boards. I got them to ice them identically with chocolate ganache, with the sides rolled in white chocolate shavings.

The day before the wedding, my fellow bridesmaid and I picked them up and took them on a two-hour car ride (mercifully, on very straight roads).

Later that night, the groom helped me engineer the two together, inserting dowel rods to keep the top layer from collapsing into the bottom. With no storage option, we carefully manoeuvred the cake into a beer fridge and prayed it would survive the night.

The next morning, I returned to the venue, rescued the cake from the fridge and plopped some white roses on top. Just like that, the job was done.

The cake looked beautiful, my 22-year friendship with the bride is still intact and my mental health is sound. I may never make a special occasion cake again.

Are you prone to making special occasion cake promises? Do you have any secret tips?

Saturday, April 04, 2015

Kombucha 101: Fermented drinks for beginners

Kombucha - a kind of slightly fizzy fermented tea - is having a moment. 

The drink, which is made from sugar, tea, bacteria and yeast, has been around for centuries, but a resurgence in all things fermented means it's especially hot right now. There are Facebook groups devoted to sharing 'scobies' (the culture needed to make the drink), commercially made versions that sell for up to NZ$20 for a 750ml bottle and loads of forums where devoteees discuss the best kinds of tea and sugar to use. A kombucha bar, with six different kinds of kombucha available on tap, even opened in the hip Sydney neighbourhood of Leichhardt last week. 

Devotees believe kombucha has all sorts of health benefits thanks to its probiotic properties. I'm not in a position to make any claims as to kombucha's efficacy - it hasn't cured me of anything or driven me to Instagram my abs on a daily basis - but I do think it's good for digestion. More importantly, I like the way it tastes, which is my main consideration.

Berry kombucha, brewed in November 2014
I've been making my own kombucha since late last year, after receiving a scoby from someone I met via the 'Fermenting Freaks Forever' Facebook group. I know it might sound strange to invite a perfect stranger to send you a gelatinous-looking yeast culture in the post, but it's worked out well. So far I've shared the scobies I've grown with lots of other strangers - as well as any advice I can give them about brewing the perfect batch. 

If you're in New Zealand and you'd like a scoby, don't buy one. Look on Freecycle or Facebook - there is bound to be someone in your community who has some to give away. If you're in Wellington, feel free to contact me - I have more than I know what to do with.

There's loads of information available online about how to get started, but a lot of people find it extremely confusing to navigate. Here's the advice I give to my kombucha recipients - and they've all been successful so far.

Continuous brew kombucha (that's the scoby floating in the tea). Image:Catherine Adam
Kombucha 101
As well as a scoby (which stands for Symbiotic Culture Of Bacteria and Yeast), you'll need a large glass vessel. I recommend scouring your local op shop for a large jar - like a two-litre gherkin jar, or similar - to see if you like it, before rushing off to invest in a big vessel with a spigot. The latter can be found in most homewares stores - the one in the picture came from The Warehouse. Make sure the spigot is plastic (most of them are). You'll also need a supply of glass bottles with lids in which to bottle the brew. I use clean screwtop wine bottles - for some reason we always have plenty of those to hand.

This is how you make what they call 'continuous brew' kombucha - because it's always on the go. If you want to have a rest from it at any stage, then put it in the fridge and bring it back to life on your return.

What you need:

13 cups boiling water
2/3 cup sugar
8 plain black or green teabags (or 2 Tbsp looseleaf tea)
1 scoby and 1 cup kombucha (this is often referred to as 'starter tea' - anyone who gives you a scoby will give you some starter tea as well)

What you need to do:

1. Put the boiling water and sugar in a large pot and stir well. Let cool for a bit, then add the teabags and let them steep for 10-15 minutes. Carefully pull them out and let the hot tea cool to room temperature.

2. Carefully pour the cooled tea into your nice, clean glass vessel (strain it through a fine sieve if you have used teabags). Gently pour in the kombucha liquid and scoby. 

3. Cover the top of the glass vessel with a piece of muslin or fabric and secure with a rubber band or piece of string. This allows the kombucha to breathe, but keeps out flies and other bugs. Leave in an open spot, out of direct sunlight. 

4. After a week, taste the kombucha - it should be 'dry', but not too vinegar-y, with that distinctive flavour. If you think it's ready, then drain it into bottles and add flavouring to them, eg fruit, ginger, lemon or orange zest and 1 tsp sugar. The kombucha will eat up all the sugar, so don't worry about adding it. 

5. Seal the bottles tightly and set aside until you are ready to drink them. They will keep fermenting - if you want to stop the process, put them in the fridge. 

Important things to remember:

1. Make sure you leave at least one cup of kombucha with your scoby at all times or it will find it hard to make more. As it grows, it will form new layers in your jar. This is perfectly normal and a good sign. If, however, it looks like it is growing furry mould, then this is NOT good and you may have to start again. 

2. Make sure you keep everything super clean - clean the bottles and lids with hot soapy water and rinse well with boiling water.

3. Plain white sugar is best - do NOT use honey as it can affect how the scoby grows. Avoid brown sugar too - it makes the kombucha quite yeasty and seems quite sweet.

4. Save any flavouring to the 'second ferment' eg when the kombucha is bottled. The scoby doesn't like any flavoured or herbal teas - just ordinary gumboot tea is perfectly fine. It's like a tradesman - it likes hot, sweet, ordinary tea and regular praise!

5. However, if you want to be fancy, green tea or white tea is also good. You can use decaffeinated black tea, but I'd advise throwing in a normal teabag or two for flavour reasons. Decaff' tea by itself is a bit tasteless. White tea gives the kombucha a delicate, floral flavour.

6. When it comes to flavouring the second ferment, anything goes. I most often use frozen berries (say, six frozen blueberries and a teaspoon of sugar to 750ml kombucha), or slices of fresh ginger. Elderflower and ginger is another gorgeous combination. My all-time favourite is using my sister's homemade crystallised orange peel and a few slices of fresh ginger for a kind of Cointreau-ish kombucha.

7. The kombucha will ferment a lot faster in warmer weather - you may need to check it earlier. If you have left it too long for it to be pleasant to drink, you can always bottle it as vinegar. I've successfully made fridge pickles using kombucha vinegar and my sister-in-law has made raspberry kombucha vinegar. 

Are you a kombucha fan?

Monday, March 30, 2015

Pretend hot cross buns

Long-time readers will know that I'm a traditionalist when it comes to Easter - no hot cross buns before Good Friday; no Easter eggs before Easter Sunday. That's not to say that it doesn't get extremely hard to resist these things sometimes, especially when a packet of hot cross buns turns up in  your kitchen at breakfast time on a Saturday morning.
My resolve to give up chocolate for Lent has wobbled a bit in recent weeks - chocolate icecream doesn't really count, does it? - but I'm staying strong on the HCBs. Mainly that's because I've invented some you can eat at any time, guilt-free. Here's how.


'Pretend' Hot Cross Buns
These lookalike 'buns' - really bliss balls with the flavours of hot cross buns and white chocolate crosses - have many things going for them. My favourite, though, is that you can eat them while you're waiting for the real ones to cook (or toast). What are you waiting for?

1 cup sultanas
1 cup ground almonds
1 1/2 tsp mixed spice
2 Tbsp coconut oil (or olive oil)
1 Tbsp honey
finely grated zest of one orange
1/2 tsp pure vanilla extract
1/2 cup roughly chopped white chocolate

Put all ingredients except the chocolate into a food processor and whiz until you can pinch together small amounts. Take dessertspoon-sized heaps of the mixture and form into square-ish 'buns' and place on a tray lined with baking paper.
Gently melt the white chocolate - put it in a small bowl, then set this over a bowl of freshly boiled water from the kettle - and put into a small ziplock bag or piping bag. Pipe crosses over the buns and leave to set. Store in the fridge - makes about 18 'buns'.

Tuesday, March 24, 2015

Baby octopus with lemon and herbs

Whenever visitors to Wellington ask about Te Papa, there's only ever one thing we tell them to see - the colossal squid. This creature of the deep has become such a feature in our lives that I fear the day that it disintegrates altogether and we are allowed to look at other exhibits. But it has also engendered a great interest in squid of all sizes - including the ones you can eat.
To capitalise on a sudden resurgence in interest (prompted by some recent sea adventures), I came up with this almost-instant tapas-style octopus, which takes five minutes and looks a lot more complicated than it is. It's certainly a lot less complex than catching a colossal squid - but you'll have to go to Te Papa to see how they did that.


Baby octopus with lemon and herbs
It might seem a bit of a fiddly task, but I recommend cutting off the hood (which contains what is known in our household as 'the poo-ey bit') of the octopus before you start. It'll only take a minute and makes them much more pleasant to eat.

500g baby octopus, hoods removed and discarded
100ml freshly squeezed lemon juice (about two lemons' worth)
zest of two lemons
2 Tbsp fish sauce
2 Tbsp peanut oil
2 cloves garlic, finely sliced
2cm piece of fresh ginger, grated
a handful of fresh herbs - coriander, dill, parsley, chervil

Fill a small bowl with cold water and ice cubes, and set aside.
Bring a pot of water to the boil. When it's boiling, add a good pinch of salt and the baby octopi. They will curl up and blanch pretty much immediately - as soon as they do, remove them with tongs and drop them into the iced water.
Mix all the other ingredients together in a bowl and add the drained octopi. Stir well and season with salt and pepper, then serve. Serves four as a tapas-style appetiser.

Do you have a favourite food-related exhibit at your local museum?

Monday, March 09, 2015

Five great bakes for Good Bitches Baking

Are you a Good Bitch? I am. In fact, I'm one of many.

I'm not telling you this to show off, but to get you to join us in a kind of sweet revolutionary movement. Good Bitches Baking is an attempt to make the world a better place via the medium of cake and biscuits. It's been set up by two amazing women, Marie Fitzpatrick and Nicole Murray, who recognised the value of the little things (and cake) in tough times.


Since September, they've harnessed a miniature army of around 80 keen cooks in Wellington alone who bake for people in times of strife. Recipients here so far include hospices, refuges, City Missions, a soup kitchen, boarding houses and the Neo-Natal Trust.

If you're not a Good Bitch but you'd like to help, then you can find out more about Good Bitches Baking or visit the Good Bitches Baking GiveALittle page.

If you are a Good Bitch and you need ideas for easily made, easily transported, easily consumed home-style baking, then this list is designed to help. Here goes...

1. Big Fat Ginger Crunch
This is an excellent GBB bake, because the not-so-pretty edge pieces can find their ways into lunchboxes the next day. I use this Spicy Ginger Crunch recipe  most of the time, though Chelsea Winter's Oaty Ginger Crunch is pretty great too.


2. Wholesome Fruity Muffins
These super-popular muffins are a not as heavy as those bran bullets of old, but they're not pretend cakes, either. This recipe is vegan, but I've been making them recently with regular milk and two eggs instead of the banana.


3. Double Chocolate Beetroot Cakes
Having said all that, these are definitely cakes in muffin form - a big hit of antioxidant-rich beetroot, chocolate and a fluffy hat of cream cheese frosting. This recipe makes a big batch so there may be some left over for your at-home testers...


4. White Chocolate And Lemon Bars
I can only ever make this if I know I am giving it away immediately - otherwise I'd probably eat the tray in an afternoon, all by myself. I use this Lime And White Chocolate Bars recipe, but often switch out the lime for lemon, and add dried cranberries or apricots. SO good! This recipe is also great for steamy summer/autumn days, when slaving over a hot oven makes you feel bitchy (not in a good way).


5. Old-Fashioned Fruit Loaf
Alice Arndell has a fantastic old-fashioned fruit loaf recipe in her book 'Alice In Bakingland' - it makes two big loaves, freezes well and tastes great. I can't find a link to it online anywhere (you should buy her book, it's really useful for GBB weekends - the melt 'n mix banana cake is also a lifesaver) but this Juicy Fruit Loaf is always a winner.


Happy baking, everyone. In this case, charity really does begin at home!

Tuesday, February 10, 2015

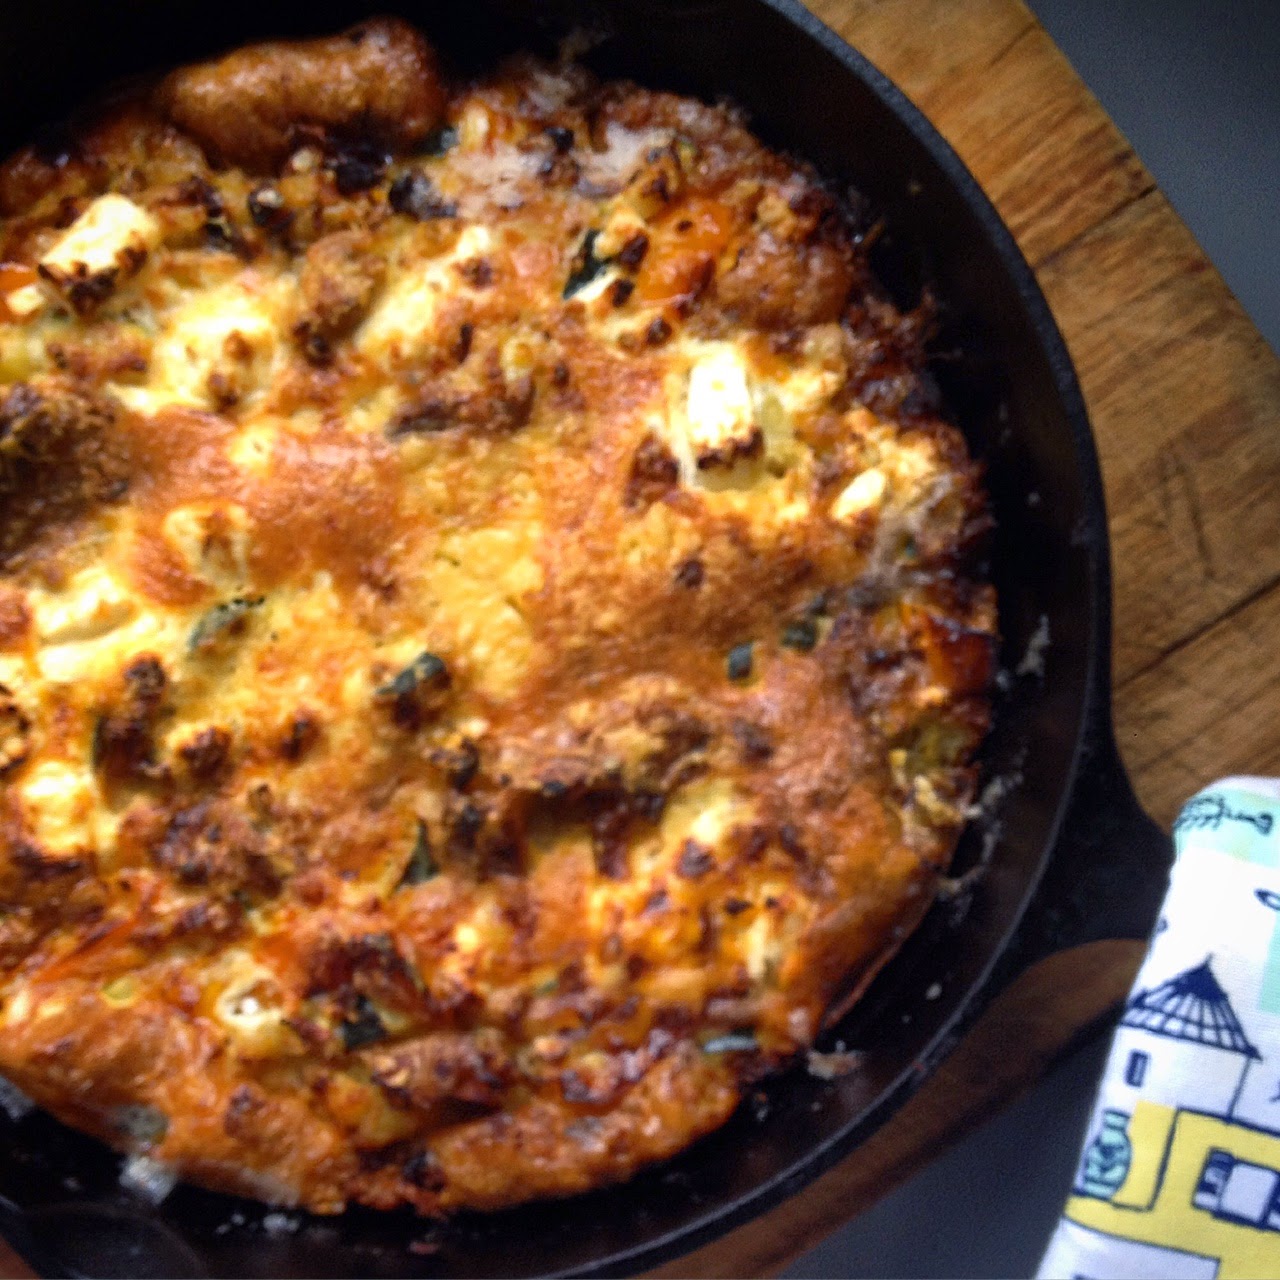
Easy frypan frittata

There comes a time in everyone's life when they get that sinking feeling. In fact, particularly unlucky people may get it several times a week. It usually strikes on their way home from work, when they realise that they have forgotten to arrange anything for dinner.

Some people shake this off and simply order takeaways, go out to eat or become a sudden devotee of fasting. Others turn to their fridges, brush the cares of the day aside and get busy with whatever they can find.

Making a meal out of 'nothing' (a relative term, I know) is one of my greatest strengths. It should be on my CV. Instead, here's an example to inspire you the next time you're in the dreaded position of Not Knowing What To Have For Dinner.

Easy All In One Vegetarian Frittata Recipe And Image By Lucy Corry

Easy Frypan Frittata
This can be customised to suit your requirements and ingredients. It fits my criteria for an 'emergency' style dinner - we always have eggs, cheese and potatoes hanging around - AND it involves very little attention or washing up afterwards. It's also a good way to rehome leftovers.

6 Tbsp olive oil
1 large onion, finely chopped
2 peppers, cored and sliced
2 cups diced cooked potato (leftover roast potatoes are good here)
3/4 cup diced feta
two handfuls grated cheddar or Parmesan cheese
8 eggs
salt and pepper
fresh herbs, if available

Turn the oven to 200C. Heat three tablespoons of the oil in a heavy cast iron frying pan (that can go in the oven later). Add the onion and peppers and cook for five minutes, until beginning to soften. Add the potato and cook for another five minutes. Add any suitable fresh herbs if you have them.
Crack the eggs into a bowl and add the feta, stir lightly to mix. Add the remaining three tablespoons of oil to the pan, then tip in the egg and cheese mixture. Sprinkle the grated cheese on top and season well with salt and pepper. Put in the waiting oven and cook for 20 minutes, until golden, puffy and set. Let sit for five minutes before slicing. Hey presto - dinner for four - with leftovers for lunch the next day if you're lucky. Bon appetit!

What's your current favourite emergency dinner?