Showing posts with label Family. Show all posts

Thursday, January 19, 2017

Three ways with... picnic food

There's a long weekend on the horizon and - though the weather is unlikely to be playing ball - I'm still hopeful that there will be enough sunshine for a picnic.

Photo: Ross Giblin/Fairfax Media
This week's Three Ways With... has a trio of picnic-friendly recipes for you to try. If all else fails, eat them while sitting on a picnic blanket in the lounge. Add lashings of ginger beer and some spy-catching for a frisson of Famous Five-style fun.

Happy weekend!

Tuesday, September 06, 2016

Chunky white choc, orange and cranberry slice

I read something last week about how 'invisible prisons' - jobs, societal pressures, parenting, caring for older relatives - meant that modern women are shackled with more responsibilities than their mothers and grandmothers. I don't know if that's true. Personally, if that's the price I have to pay for being able to vote, drive, own property and be generally free to do what I like, I'm fine with it. But last week I did find myself wishing I did a bit less. There's nothing like racing home after work on the night of the school production and remembering en route that you were supposed to bake something for the cake stall to give you conniptions, is there?

Now, I know I could have ignored the cake stall request, or I could have been more organised and done it a few days in advance. But I didn't do either of those things. Instead, I whipped up this slab of deliciousness in 20 minutes, while concurrently making boiled eggs for dinner and getting the child in and out of the bath. We then made it to the show on time, and all the lovely mothers (it's always mothers, isn't it?) who are so good they even RUN THE CAKESTALL cooed over the slice and wanted the recipe. In that moment, I felt a little bit less like a failure and more like a contributing member of society, even if my child was appearing in the show with a whopper of a black eye. But that's another story.


Chunky white choc, orange and cranberry slice
There are a zillion versions of this slice and the world probably doesn't need another one, but if you have weeks where the wheels are coming off and yet you still need to 'bake', this will save your bacon. Or bakin'. Or something.
Anyway, this version is better than all the others because it's big and chunky, and therefore more satisfying to eat. It's also slightly less sweet than some versions. If you're very, very short of time, you may like to know that it's possible to pre-crush the packet of biscuits with the full tin of condensed milk while you're stopped at the lights. Also, if you don't have quite enough biscuits, add a little more coconut. Or use less butter. If you're reading this while running to the shops, a 200g packet of dried cranberries will give you enough for the base and the topping, while a 250g block of Whittaker's white chocolate will fulfill all your chocolate needs.

100g butter
1/2 a tin (about 3/4 cup) condensed milk
300g plain sweet biscuits, bashed to large crumbs (keep a few big pieces in there for texture)
1 cup desiccated coconut
125g white chocolate, roughly chopped
zest of an orange
1 cup dried cranberries
125g white chocolate, roughly chopped

For the icing:
125g white chocolate
50g butter
1 cup icing sugar
juice of an orange (use the one you zested above)
1/2 cup dried cranberries

Line a 20 x 25cm tin (or thereabouts) with baking paper, leaving enough overhanging the sides that you can use to pull it out later.
Melt the butter and condensed milk together over low heat in a large pot. Let cool briefly, then tip in the biscuits, coconut, most of the orange zest, cranberries and chocolate. Stir to mix, then tip into the prepared tin. Press down (the overhanging paper will help here) to smooth the top. Put in the freezer.
Use the same pot to make the icing. Melt the butter and white chocolate over very, very low heat. Sift in the icing sugar and stir well, then squeeze in a little orange juice at a time until it forms a thick, spreadable mixture. Pour over the biscuit base, then sprinkle the cranberries and reserved orange zest on top. Return to the freezer for 5-10 minutes before slicing and racing out the door.
If your life is more leisurely, let the icing set in the fridge before slicing. Store in an airtight container in the fridge.


Monday, August 15, 2016

Apple and almond porridge

I'm sorry, the recent cold snap is all my fault. I was the one who said winter was over; I was the one who ignored the merino tights sale and who figured my daughter's ever-shrinking raincoat would last out the year. Rest assured I have been paying for my folly. Last weekend, while running in four layers (vest, long-sleeved running top, Icebreaker, rain jacket) plus hat, plus beanie, plus husband's gloves, all I could do was think about the steaming bowl of porridge I was going to have when I got home and my hands defrosted enough to stir the pot. The temperatures have since returned to double figures (just), but I'm not going to take any chances.


Apple and almond porridge
I find the easiest way to do this on busy mornings is to get it going over low heat and let it bubble away while I get ready for work/chivvy child out of bed/make lunches. If you're not a morning person, you can start this the night before - just put all the ingredients in a pot and leave it somewhere cold until the morning. In the summer, you can do this and call it bircher muesli. But those days are still a bit too far away to think about, I reckon.

2/3 cup rolled oats
1 apple, grated (include the skin)
2 Tbsp ground almonds
1/4 tsp ground cinnamon
1/8 tsp (a small pinch) ground cloves
a good pinch of salt
1/2 tsp vanilla extract
2 - 2 1/2 cups almond milk

Put all ingredients in a small pot and set over medium heat. Bring to a simmer, stirring often, and cook until thick and 'ploppy' (ie, bubbling lazily like a mud pool). Add more almond milk or water if it gets too thick. Serve with the porridge topping of your choice - here it's Zany Zeus Greek yoghurt, a drizzle of vanilla syrup and a scattering of chopped almonds. Cream and golden syrup are also good options. If it's a really cold day you can justify cream and Greek yoghurt...

Hope you are keeping at exactly the right temperature, wherever you are in the world.

Wednesday, August 03, 2016

How to make really good soup from nothing (and a $2.50 bunch of cavolo nero)

Today's Three Ways With... column is all about food waste - using up the stuff you'd normally throw away. While I was thinking about it, I realised I do a lot of food 'saving' that's unconscious. Things aren't so desperate that I reuse teabags (I remember seeing a posh and terrifying friend of my mother's doing this and being thoroughly shocked), but I do like to extract maximum value from things.

Leftovers get taken for work lunches, baguette ends are turned into breadcrumbs or crostini, spotty bananas are frozen for smoothies or baking - it's stuff that seems basic household common sense. But I fear that the very existence of campaigns like Love Food Hate Waste (which I'm proud to support) means that people have lost their way.

I guess if you don't cook often, or see cooking as a difficult chore, then you're less likely to think about using up your leftovers. Or, you may be like someone I know who cooks a lot, but over-caters massively and then just chucks stuff in the bin (a long-lost Presbytarian gene means I am morally outraged by this). But it's not that hard.


If you want to waste less, you need to be mindful right from the start. You need to plan meals to a certain extent, you need to shop with purpose and cook with efficiency. That means, when you get excited by seeing huge bunches of cavolo nero at the shops for $2.50, you need to think on your feet about what you're going to do with it. In this case, I let it sit in the fridge for a few days, waiting for inspiration to strike. We have a small, ill-designed fridge and it's fundamentally unsuited to having lots of stuff in it. So, when I realised the cavolo nero was balanced on Sunday night's leftover roast chicken, something stirred in my brain.

The chicken, stripped of fat and skin, went in the pot, with an onion, a carrot and some limp celery. I covered it with water and an hour or so later, I had a vat of delicious stock. I sauted the rest of the celery, another onion and some garlic in a bit of oil leftover from a jar of sundried tomatoes, added a bowl of cooked quinoa from the fridge, a kumara from the cupboard and the cavolo nero. The stock went in, along with some herbs from the garden and before long 'nothing' had turned into soup. We ate half of it on the spot, and the rest went in the freezer. Not complicated, not costly, not wasteful. Why is this stuff dressed up to be difficult?

What's your favourite way to combat food waste?


Tuesday, February 02, 2016

Lemon verbena syrup + an elegant fruit salad

Four years ago, not long after my mother died, someone I didn't know very well left a lemon verbena tree on our doorstep. I found this gesture incredibly touching and kind, not least because my parents' garden had a huge lemon verbena tree and Mum often made tea from the leaves. I'm not sure if I ever properly thanked her - but Kate, if you're reading this, I often think of that kindness when I walk past the tree.


The tree has thrived, despite my neglect, but I seldom do anything with the leaves except for the occasional cup of tea. Then, while pottering around in the kitchen a week or so ago, I made this syrup and the whole house smelled like lemon verbena. It was gorgeous.

If you've got a lemon verbena tree, make this syrup now to get a dose of that intense lemony sherbet flavour in the depths of winter (or scent your house with it in summer). You can use it in drinks (nice with soda, or with very cold vodka as a kind of martini-ish number), or pour it over vanilla ice cream, or use it in this simple and elegant fruit salad (recipe follows). I'm thinking a lemon verbena sorbet could be next...

Lemon Verbena Syrup

1/2 cup boiling water
1/2 cup caster sugar
1 packed cup lemon verbena leaves

Put the water and sugar in a small pot and set over medium heat. Stir until the sugar has dissolved, then lower the heat and add the lemon verbena. Let bubble gently for five minutes, then remove from the heat and leave to cool.
When the syrup has cooled completely, strain it through a fine sieve into a sterilised bottle or jar. Discard the lemon verbena leaves or use them as a garnish (they will be almost candied). Makes about 1/2 cup.

Simple fruit salad with lemon verbena syrup
2 white-flesh peaches
2 apricots
2 dark-fleshed plums
1 1/2 cups blueberries (or boysenberries)
1/4 cup lemon verbena syrup

Cut all the stonefruit into slim wedges - about eight slices - and put in a bowl. Pour over the syrup and stir gently, then add the berries. This can be done in advance, but I think it's nicest at room temperature rather than fridge-cold. Serves 4-6.


Monday, January 25, 2016

Paua with garlic, chilli, coriander and lime

We are blessed with the best neighbours in the world. They are great neighbours for all sorts of reasons, but for the purposes of a food blog, they are the best neighbours because they do things like turn up with freshly caught crayfish, or duck, or smoked trout. Now they've just set the bar even higher by bringing us three massive paua. It's going to take a lot of reciprocal bottles of wine and cakes to beat that one.

Paua With Garlic, Chilli, Coriander And Lime

I can't remember the last time I had fresh paua - it appears in dishes on restaurant menus sometimes but my sources tell me it's usually squid, so I never order it. When I was 13 I remember a magical holiday with cousins in the Far North of New Zealand, where the crayfish and paua were in such abundance we begged to have sausages as a treat. If you happen to have excellent neighbours, or a source of paua, here's a way to cook it.

Fast And Easy Paua With Asian Flavours

Paua with garlic, chilli, coriander and lime
Paua is notoriously tough - I remember my cousin beating it with a wine bottle to tenderise it - but my neighbour passed on the 'boil it first' method, which works well (and requires a lot less effort). Quantities here are very approximate - adjust to suit the amount of paua you have. If all else fails, do what the restaurants do and use squid instead.

Half-fill a pot with water and bring to the boil. Drop in the paua and cover the pot. Let the water come to the boil and simmer for three minutes. Drain immediately and slice the paua into thin strips.
Heat a couple of sloshes of olive oil in a large, heavy frying pan. Add a couple of cloves of garlic, sliced, some fresh chilli and a bunch of spring onions. Add the paua and cook, stirring frequently, for another couple of minutes.
Scoop onto a warm waiting plate, then squeeze over some fresh lime juice and strew with coriander. Eat immediately.

Tuesday, January 12, 2016

Hello 2016

I'm writing this in the room we grandly call 'the office'. There is just enough room for the laptop on this huge old wooden desk, jammed between a pile of notebooks on one side and a stack of what looks to be school 'art' projects, plus the recently deceased cover of the ironing board, on the other. I have a cup of tea balanced precariously on a pile of papers that includes a recipe for 'pancetta' cured kingfish and a cookbook idea I wrote down in a hurry last week. It is a mess and I really should do something about it.


The dishwasher is purring upstairs, but not so loudly that I won't be able to hear my best beloved cutting into the loaves of bread I've just taken out of the oven, despite knowing this is a terrible crime. So far, 2016, so good.


We ended 2015 with vintage champagne, whitebait fritters and lamb racks cooked to a recipe from the first Ottolenghi book, plus chocolate fondants from The Cook's Companion. The fondants were a disaster (I was so desperate not to overcook them that I erred too far in the direction of undercookedness), but no one seemed to mind. The champagne may have had something to do with that, or perhaps it's because molten chocolate is better than no chocolate. Anyway, I'm going to get them right eventually.

Apart from that, I have no pressing food goals for 2016. I'm not going to drink less wine or eat less cheese. I'd like to grow more vegetables and see if I can nurture a new sourdough starter. If that sounds all a bit too virtuous, I'm also going to master the new ice cream attachment I have for my KitchenAid.

The latter goal reminds me of a clipping I have pinned to the wall above my desk. It's a fragment of an interview with Ingrid Betancourt, the French-Colombian politician who was held hostage in the Colombian jungle by FARC guerillas for more than six years. At the end of the story, Betancourt says the experience made her decide that she would learn to cook when she got out and that she would "always have flowers in my room and wear perfume; that I would no longer forbid myself to eat ice-cream or cakes. I understood that in my life I had abandoned too many little pleasures, taking them for granted."


Ingrid Betancourt had to suffer unspeakable horrors to reach that realisation, the rest of us should learn from it. Like she says at the end of the story, "I never say no to an ice-cream."

What are your ice cream dreams for 2016?

Monday, December 14, 2015

Roadtest: The Zoku Quick Pop Maker

"Mu-umm," she says, bedraggled and worn-out at the end of a busy day at school. "I'm very hot and bothered. Do you think it's a good day to have an iceblock?"

This is what's known as parental roulette. Say yes, and you've got a 10-minute walk to the village, followed by a five-minute high, which will not be enough to get you all the way home again.  Say no, and you get a stompy six-year-old who is less than impressed with your suggestion that a nice glass of cold water when you get home will help her cool down.


After roadtesting the Zoku Quick Pop Maker, I may have found the solution.


Zoku's Quick Pop Makers are benchtop instant freezing units. You keep them in your freezer (the three-pop maker takes up about the same amount of space as a two-litre ice cream container), then whip them out to make DIY ice 'pops' (that's ice blocks to Kiwis and ice lollies to the British) in less than 10 minutes. You can make them as simple or as fancy as you like (Zoku even have a dazzling recipe book full of inspiring ideas) and - best of all - you get to control exactly what goes into them. We made the Mint Choc Chip Pops from the recipe book, using organic whole milk, agave nectar, peppermint essence and Whittaker's 72 per cent cacao chocolate - and they were fabulous.


Sound too good to be true? After some spectacular failures when trying to make homemade pops the normal way (I find they never, ever come out of the molds cleanly enough), I was very skeptical. But the Zoku worked an absolute charm. You release the pops with the aid of the 'Quick Tool' (included in each kit) and it's a mostly angst-free process. The pops are ready to eat then and there, but you can carefully wrap them in plastic and return them to the freezer to eat another day.

On the downside, they're not completely instant. The unit has to be frozen for 24 hours before you use it, and it's only good for two or three batches in a sitting. I found the second and third batches took a lot longer to freeze - and for the third, I actually returned the whole unit to the freezer for half an hour to make sure they set properly. You also need to wait for it to defrost before you clean it.

All things considered though, it's a pretty fun addition to the kitchen. A Quick Pop Maker would also make a fantastic family Christmas present for the people with everything. If you're going to buy your children a device of some kind, at least get them one that encourages real-time social interaction!

THE DETAILS
Zoku Quick Pop Makers come in three sizes - single (RRP $49.99), duo and triple (RRP $110). Each comes with a Quick Tool, sticks and drip guards, plus instructions. Find New Zealand stockists here.

GIVEAWAY
Want to win a Quick Pop Maker? Check out The Kitchenmaid on Facebook for your chance to win one!

Sunday, December 06, 2015

Fast oven-baked fish with a crunchy crust

I'm not normally given to wandering down the cereals aisle of the supermarket, but I did feel a pang of nostalgia when homegrown brand Hubbards turned 25 about six weeks ago. A quarter of a century! Where did the time go?

I remember my mother being very fond of 'Mr Hubbard', who did then-unthinkable things like include a chatty newsletter in each box of muesli and engage with his customers. That was a pretty big deal in the pre-internet age, as was their attitude to social responsibility. Of course, the mueslis were pretty good too, not least because they featured utterly addictive YCRs (otherwise known as yoghurt-covered raisins). In later years I remember a friend saying he thought Hubbards should just make boxes of YCRs rather than families and flatmates fall out over who ate the last ones. 

On a recent supermarket sweep I discovered that Hubbards now make all manner of new cereals over and above the old favourites (including a special 25th birthday one that contains chocolate and raspberries). It's great to see them in such good health. Happy birthday, Hubbards. See you at 50. 


Fast oven-baked fish with a crunchy crust
The youngest member of our household is mad for what she calls 'crumbled fish' - that is, fish in a panko breadcrumb crust, fried in a pan. That's all very well, but this is a faster, slightly healthier way to get the same crunchy kick. I used Hubbards' Simply Toasted Muesli with nuts and seeds - I'd suggest opting for something similarly plain. This is one occasion where yoghurt-covered raisins are not the answer.

4 fillets tarakihi or similar
1 Tbsp cornflour
1 egg, lightly beaten
1 1/2 cups muesli
2 Tbsp olive oil
salt and pepper

Heat the oven to 200C and line a baking dish with foil. Put the beaten egg in a shallow bowl and put the muesli in another shallow dish.
Dust the fish with cornflour, then dip each fillet into the egg mixture before coating it with the muesli. Repeat until all the fillets are coated.
Grease the foil with one tablespoon of the olive oil, and lay the fillets on top. Grind over some salt and pepper, then drizzle over the remaining oil.
Bake in the preheated oven for 5-10 minutes, depending on the thickness of the fish. Remember it will keep cooking a little after you take it out of the oven.
Serve immediately with lemons and fresh herbs. Serves four.

Have a great week, everyone x

Friday, November 13, 2015

Good Things: November 2015

"Guess what, Mum?" says the six-year-old, standing beside the bed at 6.30am with a book, a frisbee and a teddy. "It's only six weeks until Christmas!"

I'm afraid she's right, but I'm trying not to think about it. Instead, I'm going to focus on the nice things about November. If I concentrate hard, time will go slower, right?


I wanted to hate this book, I really did. I mean, it's hard to love a cookbook - or indeed, any book - when the first pages are filled with young, bronzed people in their swimmers. But, all bias aside, it's actually fantastic.

On the face of it, Bondi Harvest sounds like a PR dream. It's the brainchild of two Bondi-based surfing mates, one of whom is a chef, the other a photographer and film maker, who decided to collaborate on some Youtube cooking videos, then a book. What makes you forgive the surfing palaver and the shots of people in bikinis is that the recipes are lovely, with a focus on fresh ingredients and gutsy flavours. I'm probably never going to frolic on the sands of Bondi while wearing a tiny bikini and drinking a green smoothie, but I am looking forward to making some of Guy Turland's recipes.

Lots of people I know are still being struck down by unseasonal colds and other miseries - which makes Mother Earth's new UMF Manuka Honey seem like a gift from the gods. Not all manuka honeys are created equal (and some are about as manuka'd as I am), but this one has been certified by the industry-supported Unique Manuka Factor Honey Association. The Mother Earth honeys come in two UMF strengths, UMF 5+ and UMF 10+, with the higher number indicating a higher degree of purity and quality. Importantly, they taste amazing, with those rich, earthy flavours associated with manuka honeys. Mother Earth's UMF Manuka Honeys start from $17.99 for 250g. 


As a proud Good Bitch (and baker), I'm very excited to reveal the gorgeous products the Head Bitches have created to raise funds. There's a pair of teatowels (one of which features a top-secret ginger crunch recipe) and a gorgeous calendar, plus you can still get your hands on one of the exclusive 'Baking Bad' t-shirts from earlier in the year. All these things have got Christmas giving written all over them. Go on, buy a set!

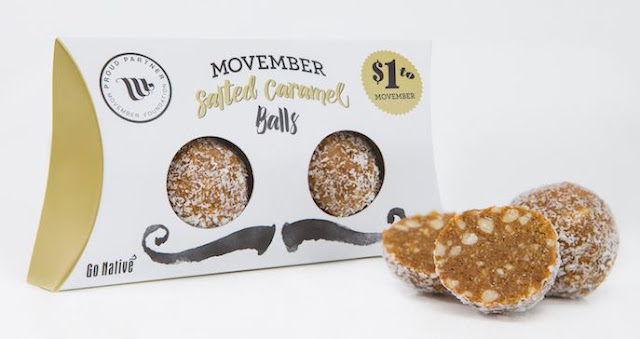
Speaking of charity, if you're wanting to do your bit for Movember but can't find it in you to grow a mo' you can always grab my neighbour's balls. Go on, he'd love you to grab a pair.


These salted caramel balls are insanely addictive, all-natural, and a not-for-profit fundraising venture dreamed up by my neighbour (of Wellington-based food company Go Native) to raise funds for Movember. They're $2.99 a pack, and a dollar from each one sold goes to men's health initiatives.


Last but by no means least, I'm very flattered to be in the running for Best Kids' Food Blog in the 2015 Munch Food Awards. You can vote in this category - as well as name and shame the worst kids' foods - here.

Have a great weekend everyone x

Wednesday, October 07, 2015

Five ways with cheese

Smile, it's National Cheese Month! I know these things (National Donut Day, anyone?) are spurious at best, but if the New Zealand Specialist Cheesemakers Association wants us to dedicate October to the noble activity of eating cheese, I'm not about to argue.

Instead, I humbly offer you five of my favourite cheesy recipes...


 Secret cheese and onion bread - soft, white, pillowy dough, with a molten cheese middle. Blissful.


Roasted cauliflower cheese - exactly what it says, but with spices (and optional potatoes, or greens, or both).


Jenny's cheesy potatoes - an absolute Corry family classic (no one can make them like Jenny can, but with practice, you can nearly reach cheese and potato nirvana).


Bermuda salad - a Moosewood Cookbook number, in which cheese plays an important but not overpowering role. I was dubious too, but it's very good.


Sara Lee cheesecake - looks just like a bought one, tastes a million times better (and is about as easy to make as pulling one out of a packet).

What's your favourite thing to do with cheese?

Monday, August 17, 2015

Pork osso bucco with apples and silverbeet

Whenever I go to the supermarket I take great delight in trying to circumvent all those tricks they use to try to make you buy things you didn't know you needed. I'm not very successful though, which is how I ended up with two packets of pork osso bucco and a huge bunch of silverbeet when I nipped into Moore Wilson's on Sunday morning to buy some fish.

Here's what I did with it...


Pork osso bucco with apples and chard
This requires a maximum of 15 minutes of concentration and chopping at the start, then you can wander away to do its thing unattended in the oven for a couple of hours. Obviously that means it's not the sort of thing you start making after work, but if you make it on a Sunday it can then wait patiently in the fridge for you to eat on Monday. And I don't know about you, but coming home on Monday night knowing that dinner is already cooked is the most wonderful feeling in the world.

2 Tbsp olive oil
2 onions, finely chopped
2 cloves garlic, finely sliced
1 cup celery (leaves and ribs), finely chopped
1 tsp fennel seeds
1.2kg pork osso bucco
1 cup white wine
1 cup water
2 large apples, cored and sliced
1 bunch Swiss chard, finely chopped (including stems)
salt and pepper

Heat the oven to 150C.
Heat one tablespoon of the oil in a large, heavy, ovenproof pot. Add the onions, garlic and celery along with a pinch of salt and the fennel seeds. Cover and cook for 5-10 minutes, until the vegetables are soft and beginning to brown.
Remove the vegetables from the pot with a slotted spoon, then return it to the heat and add the remaining tablespoon of oil. Brown the pieces of pork on all sides (you may have to do this in batches), then return the vegetables to the pot. Pour in the wine and water - careful, it will spit - then layer the apples and silverbeet on top. Season well, then cover and put in the preheated oven.
Cook for two to two and a half hours, or until the meat has falling off the bones. Taste for seasoning and serve with some crusty bread.

Have a great week, everyone.

Sunday, August 09, 2015

Spicy pumpkin, tomato and coconut soup

Earlier this year a Google soup recipe search habits survey found pumpkin soup was the top of the list in New Zealand, for the third year in a row. Are Kiwis creatures of habit, huge consumers of pumpkin, or just really boring? Perhaps it's a combination of all three. While you ponder that, here's my latest pumpkin soup variation (which uses a respectable amount of pumpkin, but isn't remotely boring. I hope.)


Spicy pumpkin, tomato and coconut soup
This is quick, easy and very warming, which means it meets all the criteria for a simple Sunday lunch (with enough leftover for a lucky person to take to work on Monday). Serves 3-4.

1 Tbsp extra virgin olive oil
1 onion, finely chopped
2 cloves garlic, finely sliced
a good pinch of salt
2 tsp garam masala
2 tsp dried chilli flakes
1 kg pumpkin, peeled, seeded and cut into 2cm chunks
1 x 440g can chopped tomatoes
1 x 440ml can coconut milk

Heat the oil in a large, heavy pot and add the onion and garlic. Cook, stirring occasionally, for five minutes, then add the spices and salt. Let cook for another couple of minutes, then tip in the pumpkin. Cover and cook for five minutes, then add the tomatoes. Half-fill the tomato can with water and add to the pot, then cover and cook for another 15 minutes, or until the pumpkin is soft.
Remove from the heat and mash roughly with a potato masher (or use a stick blender, if you like soup to be very smooth) then add the coconut milk. Stir well and return to the heat. Bring to a simmer, then serve immediately.

If this one doesn't take your fancy, try this hands-free pumpkin and chipotle soup.

Have a great week, everyone x

Sunday, July 19, 2015

Creme fraiche and chocolate nut truffles

Last Sunday my sister-in-law turned up on my doorstep with a huge chocolate cake, a tub of Zany Zeus creme fraiche and a jar of Fix and Fogg chocolate peanut butter.


We anointed the cake with dollops of both - such a good activity on a winter Sunday afternoon, sitting around, eating cake with chocolate peanut butter on top - and then they left. "I expect you to do something creative with that peanut butter," she called over her shoulder as they left. "No chance," I said. "I'm just going to eat it out of the jar."

But it turns out there's only so many spoonfuls of chocolate peanut butter and creme fraiche you can eat in a week. Here's what you should do with the rest.

Easy Chocolate Peanut Butter And Creme Fraiche Truffles

Creme fraiche and chocolate nut truffles
If you're not in the habit of having either of the main ingredients lying around, you could always make your own creme fraiche AND make your own salted chocolate nut butter. Then you can whip these up whenever you like, rather than for the rare occasions when you have some going spare.

1/2 cup creme fraiche
1/3 cup chocolate peanut butter
1/4 cup ground almonds
1/2 tsp pure vanilla
1/3 cup finely chopped dark chocolate (about 10 squares of Whittaker's Dark Ghana)
a good pinch of sea salt

For rolling:
2 Tbsp ground almonds
1 Tbsp cocoa, sifted

To make the truffles, put all ingredients in a bowl and beat until well combined.
Mix the second measure of ground almonds and cocoa together in a shallow bowl.
Roll teaspoonfuls of the mixture into small balls, then roll them in the almonds and cocoa. Leave in the fridge to set for 30 minutes before eating. Store, covered, in the fridge. Makes about 22 balls, depending on how much you eat in the process.

Have a great week, everyone!


Monday, June 29, 2015

How to knit an egg cosy (and make fork pompoms)

One of the happiest winters of my life was spent in Whanganui, where my lovely friend Anna and I amused ourselves with sewing, cooking, art projects and soaking in the fire bath in our garden. If it sounds all a bit Little House On The Prairie, that's because it was. The house we rented felt very much like an idyll from the rest of the world, kept warm by the hum of sewing machines and a constantly-boiling kettle.

Life seems to have become a lot less idyllic of late, but I've decided there is still room in my life for little projects.  Especially slightly ridiculous ones as soothing as knitting an egg cosy.

Very Easy Egg Cosy Knitting Pattern For Beginners

Lucy's Easy Egg Cosy
I devised this pattern after knitting my daughter a woolly hat - essentially a rectangle that you draw up at the end. This lacks the absolute charm of a more complicated pattern but it's an excellent confidence booster for amateur knitters. The one in the picture is a little bigger than it's supposed to be - or perhaps I bought shorter than average eggs - but this pattern should make one that's just the right size.

You will need:
8mm knitting needles
Double knitting wool - use up any scraps you have, as long as they're the same ply
Wool needle

Cast on 28 stitches. Knit one row, then purl the next. Continue in this fashion until the work measures 6.5cm, changing colour as your wool supplies allow.
Thread a wool needle (as in, a sewing needle, not a knitting needle) with wool and slip it through the stitches as you slip them off the knitting needle. Gather both ends of this wool together and pull tightly - the knitted work will come together like the opening of a drawstring bag. Knot together tightly.
Carefully turn the egg cosy inside out and stitch the open side together. Trim any loose threads and hey presto, your eggs will never grow cold again. For added style at breakfast time, add a tiny fork pompom on top. Instructions follow below...

How To Make Fork Pompoms

How to make a fork pompom
When I made my daughter's hat, making the fist-sized pompom for the top seemed to take nearly as long as the knitting did (and it used nearly as much wool!)
These tiny pompoms are much faster than the traditional cardboard donut method. All you need to do is to wind the wool around the tines of a fork - I've used a cake fork in the image above - until you have a fat wodge of wool. Slip another piece of wool between the tines and the wrapped bundle, then tie tightly in the middle (I've used a different colour here for display purposes). Slip the tied bundle off the tines, then snip the ends of the pompom as usual. Be careful not to trim it too agressively if it's a very little pompom as it may fall apart.

Have you got a winter project on the go?

Friday, May 29, 2015

Miso-roasted pumpkin

It's funny the things that stick in your head. For example, the sole thing I remember from the Queen's last visit to New Zealand (don't ask me when it was, I'm not that much of a royalist) is that she requested pumpkin to be served at a dinner at Huka Lodge.

This always struck me as weird, a bit like when Kate Winslet was found shopping in Pagani in Masterton. Because as much as I love pumpkin, it's not particularly fancy. Maybe that's what Queenie likes about it - perhaps she tires of foie gras and roasted grouse and longs to eat roast pumpkin in front of Coronation St. (There's still no explanation for Kate and Pagani. None.)

In any case, with the long weekend in the Queen's honour approaching, here's a recipe for pumpkin that's fit for royals and commoners alike.

Miso-Roasted-Pumpkin The Kitchenmaid/Lucy Corry

Miso-Roasted Pumpkin
This is a very easy way to make pumpkin more exciting. If you don't like pumpkin, try stirring this miso butter through hot rice - instant comfort food.

1 kg crown pumpkin, cut into six wedges (leave the skin on)
50g unsalted butter
4 Tbsp white miso paste
cracked pepper

Heat the oven to 200C and line a small roasting dish with foil.
Put the pumpkin on the tray.
Beat the butter and miso together until soft and spreadable, then pat onto the pumpkin. Grind over lots of black pepper and bake for 30-40 minutes, until the pumpkin is cooked and the miso butter has browned.

Have a great weekend, everyone x

Monday, April 27, 2015

Peaches, pistachio and chocolate

This is the inverse of Three Ways With - instead of being three ways with one ingredient, it's one way with three. Confused? Don't be. This photo explains everything.

Peaches With Pistachio And Chocolate

Peaches with pistachio and chocolate
This is such a simple idea I'm reluctant to call it a recipe. But it's worth sharing - not least because the the April edition of We Should Cocoa is all about no-bake things to do with chocolate. If you've got these ingredients close at hand, this is a five-minute job.

12 dried peach halves (I use the Alison's Pantry ones)
150g dark chocolate (I use Whittaker's Dark Ghana)
1/2 cup shelled pistachio nuts, roughly chopped

Lay the peach halves on a tray, cut side up.
Melt the chocolate - in a bowl over simmering water, or in a low oven - and spoon a little on top of each peach. Sprinkle each one with chopped pistachios and leave to set (about five minutes).
Serve immediately or store in an airtight tin.

Have a great week, everyone x

Saturday, April 04, 2015

Kombucha 101: Fermented drinks for beginners

Kombucha - a kind of slightly fizzy fermented tea - is having a moment. 

The drink, which is made from sugar, tea, bacteria and yeast, has been around for centuries, but a resurgence in all things fermented means it's especially hot right now. There are Facebook groups devoted to sharing 'scobies' (the culture needed to make the drink), commercially made versions that sell for up to NZ$20 for a 750ml bottle and loads of forums where devoteees discuss the best kinds of tea and sugar to use. A kombucha bar, with six different kinds of kombucha available on tap, even opened in the hip Sydney neighbourhood of Leichhardt last week. 

Devotees believe kombucha has all sorts of health benefits thanks to its probiotic properties. I'm not in a position to make any claims as to kombucha's efficacy - it hasn't cured me of anything or driven me to Instagram my abs on a daily basis - but I do think it's good for digestion. More importantly, I like the way it tastes, which is my main consideration.

Berry kombucha, brewed in November 2014
I've been making my own kombucha since late last year, after receiving a scoby from someone I met via the 'Fermenting Freaks Forever' Facebook group. I know it might sound strange to invite a perfect stranger to send you a gelatinous-looking yeast culture in the post, but it's worked out well. So far I've shared the scobies I've grown with lots of other strangers - as well as any advice I can give them about brewing the perfect batch. 

If you're in New Zealand and you'd like a scoby, don't buy one. Look on Freecycle or Facebook - there is bound to be someone in your community who has some to give away. If you're in Wellington, feel free to contact me - I have more than I know what to do with.

There's loads of information available online about how to get started, but a lot of people find it extremely confusing to navigate. Here's the advice I give to my kombucha recipients - and they've all been successful so far.

Continuous brew kombucha (that's the scoby floating in the tea). Image:Catherine Adam
Kombucha 101
As well as a scoby (which stands for Symbiotic Culture Of Bacteria and Yeast), you'll need a large glass vessel. I recommend scouring your local op shop for a large jar - like a two-litre gherkin jar, or similar - to see if you like it, before rushing off to invest in a big vessel with a spigot. The latter can be found in most homewares stores - the one in the picture came from The Warehouse. Make sure the spigot is plastic (most of them are). You'll also need a supply of glass bottles with lids in which to bottle the brew. I use clean screwtop wine bottles - for some reason we always have plenty of those to hand.

This is how you make what they call 'continuous brew' kombucha - because it's always on the go. If you want to have a rest from it at any stage, then put it in the fridge and bring it back to life on your return.

What you need:

13 cups boiling water
2/3 cup sugar
8 plain black or green teabags (or 2 Tbsp looseleaf tea)
1 scoby and 1 cup kombucha (this is often referred to as 'starter tea' - anyone who gives you a scoby will give you some starter tea as well)

What you need to do:

1. Put the boiling water and sugar in a large pot and stir well. Let cool for a bit, then add the teabags and let them steep for 10-15 minutes. Carefully pull them out and let the hot tea cool to room temperature.

2. Carefully pour the cooled tea into your nice, clean glass vessel (strain it through a fine sieve if you have used teabags). Gently pour in the kombucha liquid and scoby. 

3. Cover the top of the glass vessel with a piece of muslin or fabric and secure with a rubber band or piece of string. This allows the kombucha to breathe, but keeps out flies and other bugs. Leave in an open spot, out of direct sunlight. 

4. After a week, taste the kombucha - it should be 'dry', but not too vinegar-y, with that distinctive flavour. If you think it's ready, then drain it into bottles and add flavouring to them, eg fruit, ginger, lemon or orange zest and 1 tsp sugar. The kombucha will eat up all the sugar, so don't worry about adding it. 

5. Seal the bottles tightly and set aside until you are ready to drink them. They will keep fermenting - if you want to stop the process, put them in the fridge. 

Important things to remember:

1. Make sure you leave at least one cup of kombucha with your scoby at all times or it will find it hard to make more. As it grows, it will form new layers in your jar. This is perfectly normal and a good sign. If, however, it looks like it is growing furry mould, then this is NOT good and you may have to start again. 

2. Make sure you keep everything super clean - clean the bottles and lids with hot soapy water and rinse well with boiling water.

3. Plain white sugar is best - do NOT use honey as it can affect how the scoby grows. Avoid brown sugar too - it makes the kombucha quite yeasty and seems quite sweet.

4. Save any flavouring to the 'second ferment' eg when the kombucha is bottled. The scoby doesn't like any flavoured or herbal teas - just ordinary gumboot tea is perfectly fine. It's like a tradesman - it likes hot, sweet, ordinary tea and regular praise!

5. However, if you want to be fancy, green tea or white tea is also good. You can use decaffeinated black tea, but I'd advise throwing in a normal teabag or two for flavour reasons. Decaff' tea by itself is a bit tasteless. White tea gives the kombucha a delicate, floral flavour.

6. When it comes to flavouring the second ferment, anything goes. I most often use frozen berries (say, six frozen blueberries and a teaspoon of sugar to 750ml kombucha), or slices of fresh ginger. Elderflower and ginger is another gorgeous combination. My all-time favourite is using my sister's homemade crystallised orange peel and a few slices of fresh ginger for a kind of Cointreau-ish kombucha.

7. The kombucha will ferment a lot faster in warmer weather - you may need to check it earlier. If you have left it too long for it to be pleasant to drink, you can always bottle it as vinegar. I've successfully made fridge pickles using kombucha vinegar and my sister-in-law has made raspberry kombucha vinegar. 

Are you a kombucha fan?

Tuesday, March 24, 2015

Baby octopus with lemon and herbs

Whenever visitors to Wellington ask about Te Papa, there's only ever one thing we tell them to see - the colossal squid. This creature of the deep has become such a feature in our lives that I fear the day that it disintegrates altogether and we are allowed to look at other exhibits. But it has also engendered a great interest in squid of all sizes - including the ones you can eat.
To capitalise on a sudden resurgence in interest (prompted by some recent sea adventures), I came up with this almost-instant tapas-style octopus, which takes five minutes and looks a lot more complicated than it is. It's certainly a lot less complex than catching a colossal squid - but you'll have to go to Te Papa to see how they did that.


Baby octopus with lemon and herbs
It might seem a bit of a fiddly task, but I recommend cutting off the hood (which contains what is known in our household as 'the poo-ey bit') of the octopus before you start. It'll only take a minute and makes them much more pleasant to eat.

500g baby octopus, hoods removed and discarded
100ml freshly squeezed lemon juice (about two lemons' worth)
zest of two lemons
2 Tbsp fish sauce
2 Tbsp peanut oil
2 cloves garlic, finely sliced
2cm piece of fresh ginger, grated
a handful of fresh herbs - coriander, dill, parsley, chervil

Fill a small bowl with cold water and ice cubes, and set aside.
Bring a pot of water to the boil. When it's boiling, add a good pinch of salt and the baby octopi. They will curl up and blanch pretty much immediately - as soon as they do, remove them with tongs and drop them into the iced water.
Mix all the other ingredients together in a bowl and add the drained octopi. Stir well and season with salt and pepper, then serve. Serves four as a tapas-style appetiser.

Do you have a favourite food-related exhibit at your local museum?

Friday, February 06, 2015

Raw beetroot bliss balls

A dear friend of mine calls herself an alternative eater - wholefoods, no meat, no refined sugar, the whole kit and kaboodle. While that makes her a rather challenging dinner guest, she's also one of the most appreciative people a cook could hope to create for. After I got over feeling daunted by her request for a birthday cake last weekend - especially one that could withstand a car journey and an afternoon in the sun - I had a burst of inspiration and these pretty-in-pink bliss balls were the result. 


Raw beetroot bliss balls - for Catherine
You don't have to be an alternative eater to love these. In fact, you don't even have to like beetroot. Soaking the almonds makes them easier to whizz up.

1 cup loosely packed grated beetroot
1 cup dates
1 /2 cup whole almonds
1/2 cup roughly chopped best quality dark chocolate or cacao nibs, optional
1/2 cup desiccated coconut, plus about 3/4 cup for rolling
Put the dates and almonds in a small heatproof bowl and cover with boiling water. Set aside for 15 minutes, then drain.
Tip the beetroot into a food processor and whiz until finely chopped. Add the drained dates and almonds, the chocolate (if using) and the 1/2 cup measure of coconut. Whizz until it clumps together.
Put the second measure of coconut into a shallow bowl. Form teaspoonfuls of the mixture into balls, then roll in the coconut. Store in the fridge. Makes around 36 small balls.

Have a great weekend, everyone x