Showing posts with label eggs. Show all posts

Thursday, January 19, 2017

Three ways with... picnic food

There's a long weekend on the horizon and - though the weather is unlikely to be playing ball - I'm still hopeful that there will be enough sunshine for a picnic.

Photo: Ross Giblin/Fairfax Media
This week's Three Ways With... has a trio of picnic-friendly recipes for you to try. If all else fails, eat them while sitting on a picnic blanket in the lounge. Add lashings of ginger beer and some spy-catching for a frisson of Famous Five-style fun.

Happy weekend!

Monday, June 29, 2015

How to knit an egg cosy (and make fork pompoms)

One of the happiest winters of my life was spent in Whanganui, where my lovely friend Anna and I amused ourselves with sewing, cooking, art projects and soaking in the fire bath in our garden. If it sounds all a bit Little House On The Prairie, that's because it was. The house we rented felt very much like an idyll from the rest of the world, kept warm by the hum of sewing machines and a constantly-boiling kettle.

Life seems to have become a lot less idyllic of late, but I've decided there is still room in my life for little projects.  Especially slightly ridiculous ones as soothing as knitting an egg cosy.

Very Easy Egg Cosy Knitting Pattern For Beginners

Lucy's Easy Egg Cosy
I devised this pattern after knitting my daughter a woolly hat - essentially a rectangle that you draw up at the end. This lacks the absolute charm of a more complicated pattern but it's an excellent confidence booster for amateur knitters. The one in the picture is a little bigger than it's supposed to be - or perhaps I bought shorter than average eggs - but this pattern should make one that's just the right size.

You will need:
8mm knitting needles
Double knitting wool - use up any scraps you have, as long as they're the same ply
Wool needle

Cast on 28 stitches. Knit one row, then purl the next. Continue in this fashion until the work measures 6.5cm, changing colour as your wool supplies allow.
Thread a wool needle (as in, a sewing needle, not a knitting needle) with wool and slip it through the stitches as you slip them off the knitting needle. Gather both ends of this wool together and pull tightly - the knitted work will come together like the opening of a drawstring bag. Knot together tightly.
Carefully turn the egg cosy inside out and stitch the open side together. Trim any loose threads and hey presto, your eggs will never grow cold again. For added style at breakfast time, add a tiny fork pompom on top. Instructions follow below...

How To Make Fork Pompoms

How to make a fork pompom
When I made my daughter's hat, making the fist-sized pompom for the top seemed to take nearly as long as the knitting did (and it used nearly as much wool!)
These tiny pompoms are much faster than the traditional cardboard donut method. All you need to do is to wind the wool around the tines of a fork - I've used a cake fork in the image above - until you have a fat wodge of wool. Slip another piece of wool between the tines and the wrapped bundle, then tie tightly in the middle (I've used a different colour here for display purposes). Slip the tied bundle off the tines, then snip the ends of the pompom as usual. Be careful not to trim it too agressively if it's a very little pompom as it may fall apart.

Have you got a winter project on the go?

Tuesday, April 21, 2015

Chocolate brioche buns

It has become very fashionable for recipes to appear in the post-Easter sugar haze exhorting ways to use up excess chocolate eggs. But because I usually give up chocolate before Easter - or at least try to - and I'm a bit fussy about the chocolate I eat, any nice Easter eggs are usually cracked and dispatched pretty quickly. This year, with a 5am wake-up call from the youngest member of our household, I spent the day eating any chocolate I could get my hands on in a bid to stay upright. By Easter Monday, I couldn't bear the sight of it.


I got fairly sick of hot cross buns this year too - spending a day making endless batches will do that to a person - and so by the time the weekend was over I wanted something light and non-fruity, but with a hint of real chocolate (not the Easter egg kind).

These fluffy brioche buns were the result. They're most excellent with a generous splodge of cream cheese and a dollop of marmalade - and with a long weekend coming up, you should think about adding them to your repertoire.


Chocolate Brioche Buns
The instructions below detail how to make these with a stand mixer - it can be done by hand, but it's a bit more labour intensive.  I've designed this recipe so the buns are ready for breakfastIf you don't want the buns for breakfast, the dough will rise in about an hour at room temperature.

275ml milk (I use Zany Zeus 'blue')
500g high grade flour
1 1/2 tsp dried yeast
1 1/2 tsp salt
1/4 cup caster sugar
2 eggs, lightly beaten
50g unsalted butter, soft but not melted, diced
80g good quality dark chocolate, melted (I use Whittaker's 60 per cent cacao)
100g good quality dark chocolate, smashed into little bits (I use Whittaker's 60 per cent cacao)

Egg wash: 1 egg beaten with 1 Tbsp milk

Sugar glaze: 1/4 cup boiling water mixed with 1/4 cup brown sugar

Scald the milk and set aside to cool to lukewarm. Add the eggs and stir to mix.
Put the flour, yeast, salt and sugar into the bowl of a freestanding mixer and stir until combined, then pour in the egg and milk mixture and mix well.
Using the dough hook, mix on low-medium speed (about 3 or 4) until the dough is shiny and elastic, about 5-8 minutes. Scrape down the sides of the bowl as necessary (turn the mixer off first!).
Keeping the mixer on medium speed, drizzle in the melted chocolate. When it has all absorbed, start add the butter, one piece at a time, until it is all mixed in.
Cover the bowl with plastic and put in the fridge overnight, during which time it will double in size.
In the morning, tip the dough out on to a lightly floured worktop. knead in more choco
Cover with a cloth for 15 minutes, while you make a cup of tea and heat the oven to 180C.
Shape the dough into 10-12 balls and place on a lined baking tray. Brush each one with egg wash and bake for 15-20 minutes, until risen and cooked through. Brush with the hot sugar glaze and remove to a rack to cool (though they will probably all be eaten before that happens).

The chocolate and egg component make this the perfect opportunity to link up with two of my favourite bloggers, Karen of Lavender and Lovage and Dom of Belleau Kitchen. This month both Karen's Tea Time Treats and Dom's latest invention, Simply Eggcellent, have a chocolate theme. Click the links to find more chocolatey, eggy goodness.

Tuesday, February 10, 2015

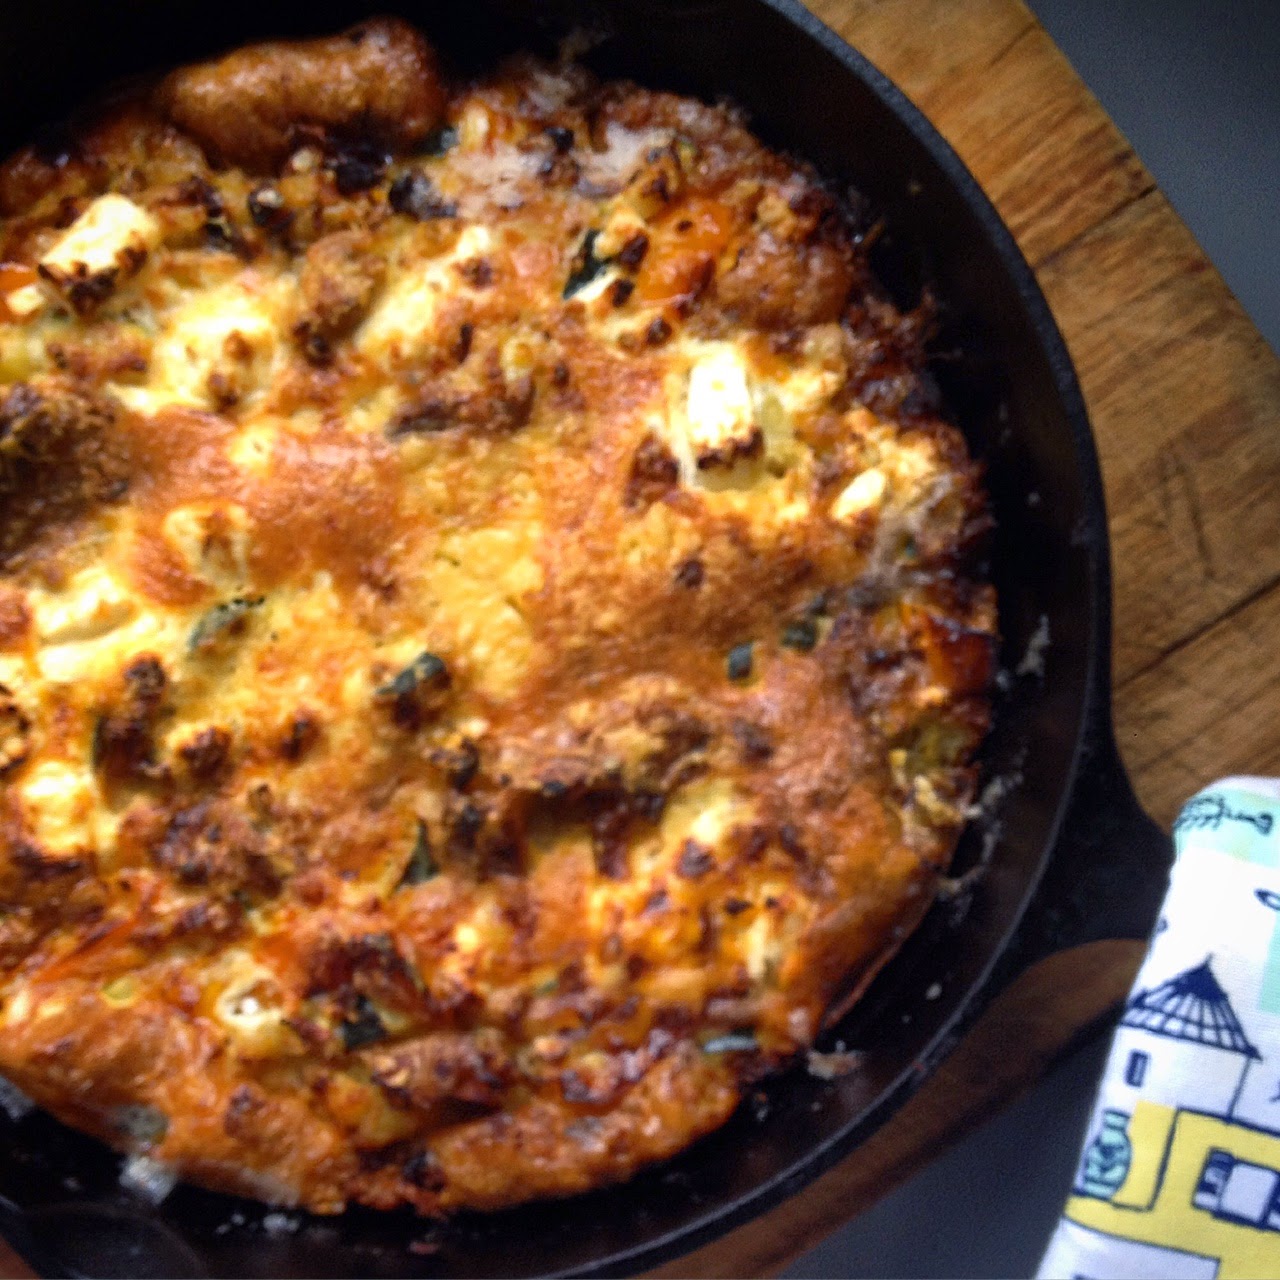
Easy frypan frittata

There comes a time in everyone's life when they get that sinking feeling. In fact, particularly unlucky people may get it several times a week. It usually strikes on their way home from work, when they realise that they have forgotten to arrange anything for dinner.

Some people shake this off and simply order takeaways, go out to eat or become a sudden devotee of fasting. Others turn to their fridges, brush the cares of the day aside and get busy with whatever they can find.

Making a meal out of 'nothing' (a relative term, I know) is one of my greatest strengths. It should be on my CV. Instead, here's an example to inspire you the next time you're in the dreaded position of Not Knowing What To Have For Dinner.

Easy All In One Vegetarian Frittata Recipe And Image By Lucy Corry

Easy Frypan Frittata
This can be customised to suit your requirements and ingredients. It fits my criteria for an 'emergency' style dinner - we always have eggs, cheese and potatoes hanging around - AND it involves very little attention or washing up afterwards. It's also a good way to rehome leftovers.

6 Tbsp olive oil
1 large onion, finely chopped
2 peppers, cored and sliced
2 cups diced cooked potato (leftover roast potatoes are good here)
3/4 cup diced feta
two handfuls grated cheddar or Parmesan cheese
8 eggs
salt and pepper
fresh herbs, if available

Turn the oven to 200C. Heat three tablespoons of the oil in a heavy cast iron frying pan (that can go in the oven later). Add the onion and peppers and cook for five minutes, until beginning to soften. Add the potato and cook for another five minutes. Add any suitable fresh herbs if you have them.
Crack the eggs into a bowl and add the feta, stir lightly to mix. Add the remaining three tablespoons of oil to the pan, then tip in the egg and cheese mixture. Sprinkle the grated cheese on top and season well with salt and pepper. Put in the waiting oven and cook for 20 minutes, until golden, puffy and set. Let sit for five minutes before slicing. Hey presto - dinner for four - with leftovers for lunch the next day if you're lucky. Bon appetit!

What's your current favourite emergency dinner?

Friday, May 30, 2014

The ultimate chocolate cake

This month the We Should Cocoa challenge has been all about making a chocolate cake for less than £1 (NZ$1.97). I have to confess I didn't even try.

Instead, I can share with you the way to make your favourite chocolate cake taste - and look - like a million dollars. It's this - a cloud of chocolate meringue buttercream that will make people close their eyes in bliss as they eat it. It defies all current trends in that it is resolutely full of sugar, butter and eggs. And it is worth every single mouthful.


The ultimate chocolate meringue buttercream
If you find ordinary buttercream icing - the sort you make with icing sugar and butter - too sweet and somewhat gritty, then this is the icing for you. It's still sweet and quite rich, but incredibly light. It's stable enough to pipe, spreads like a dream and keeps well in the freezer if you don't use it all in one go. I have to leave the house to stop myself eating it straight from the bowl before it reaches the cake. It's THAT good.

320g caster sugar
170g water
4 egg yolks
2 eggs
350g butter, at room temperature, sliced into 2cm chunks
2 tsp pure vanilla
150g good quality dark chocolate, at least 60 per cent cocoa solids, melted and at room temperature

Put the sugar and water in a small saucepan. Stir well, then boil until the temperature reaches 118C. While the syrup is boiling, put the egg yolks and eggs in the bowl of a freestanding mixer and whisk until they are light and fluffy. When the syrup has reached 118C, carefully drizzle it into the egg mixture (beating all the time). Beat on high until the mixture is thick and pale, and the sides of the bowl are cool to touch. At this point, switch from the whisk to the paddle attachment and start adding the butter, a piece at a time, until it is all mixed in. Don't fret if it starts to look a bit like mayonnaise, just keep beating it.
When the butter is all in, and the buttercream is very light and fluffy, add the vanilla and melted chocolate. Beat until well mixed in. You can use this straight away, or leave it at room temperature for a couple of hours (as long as it doesn't get too hot or cold). It also keeps in the fridge for a week, though you'll need to beat it again.

Best Chocolate Meringue Buttercream Cake Recipe: Lucy Corry/The Kitchenmaid

The Ultimate Chocolate Cake
If you want to make the ultimate chocolate cake, make two batches of this easy chocolate cake. When the cakes have completely cooled, chill them in the fridge for 30 minutes. Spread the surfaces of three of the cakes with good boysenberry jam, then a layer of chocolate meringue buttercream. Stack them on top of each other, then cover the lot with a thin 'crumb coat' of buttercream. Return to the fridge for 30 minutes to set, then cover in the remainder of the buttercream (you can go crazy here with a piping bag if you like). The cake can be left in the fridge overnight, but let it come to room temperature before serving.

Have a great weekend, everyone x

Friday, May 09, 2014

Treat me: Fairtrade choc banana cake

This week two extremely important women in the world of food visited Wellington. One attracted loads of attention while she filmed an advertisement for Whittakers chocolate; the other could have walked down Lambton Quay without attracting a second glance from anyone.

I'm not saying Nigella Lawson's Wellington sojourn didn't deserve all the fuss, but it's a shame that the equally gorgeous Rose Boatemaa Mensah wasn't as feted. Rose was in town as part of Fairtrade Fortnight - as well as being a teacher she is a cocoa farmer in Ghana. Some of the beans grown by Rose and her family end up at Whittakers, where they are turned into my favourite chocolate (and the husks even end up on our garden).


I didn't get to catch up with Rose (or Nigella) this week, but to celebrate all things Fairtrade I've whipped up this utterly lovely cake. It combines the two Fairtrade things we eat most in this house - chocolate and All Good Bananas. It's even inspired by a Nigella recipe - how circular is that?


Fairtrade Chocolate Banana Cake
If you can manage not to gobble this the minute it comes out of the oven, glistening with nuggets of melting chocolate, then it keeps really well. And I'm sure your mum would love it for Mother's Day (that's this Sunday, in case you'd forgotten).

400g ripe bananas (peeled weight) - about 3 large ones
250g ground almonds
250g caster sugar
6 eggs
grated zest of two lemons
1 tsp baking powder
100g dark chocolate, roughly chopped

Heat the oven to 180C and grease and line a 23cm springform cake tin.
Put the bananas in a food processor and whiz until pureed. Add all the other ingredients, except the chocolate and whiz again until well mixed. Pour into the prepared tin and scatter the chocolate on top.
Bake for 35-45 minutes - it will be damp and sticky but a toothpick plunged in should come out cleanly. Let cool for 10 minutes in the tin, then turn out to cool on a rack.

Have a great weekend, everyone x

Thursday, April 17, 2014

Treat me: Easy Easter Brioche

Do you dream of waking up on Good Friday to a trayful of freshly made hot cross buns? Me too. Over the years I've tried many ways of achieving this, ranging from buying them in the day before, to getting up at the crack of dawn. Neither one is particularly good - especially if you already get up at the crack of dawn and everyone in your household is ravenous at breakfast time. The first hot cross bun of the day is like the first cup of tea; you shouldn't have to wait for it.

But this way - using a clever, no-knead, no stress method - is perfect. All you do is make up a batter-like dough the night before and leave it in the fridge overnight. Then all you have to do in the morning is wait for the oven to heat up, then these lovely, light, buttery buns are ready to eat 15 minutes later. If that's not an Easter miracle, I don't know what is.

Easy Easter Brioche Buns Recipe And Photo: Lucy Corry/The Kitchenmaid

Easy Easter Brioche
If you've had hot cross bun disasters in the past or are a novice yeast baker, this is the recipe for you. There's no kneading, just a bit of energetic stirring with a wooden spoon. If you don't have a muffin tin you can make a giant loaf in a 23cm cake tin - it will take more like 25-30 minutes to cook.

200g raisins or sultanas
50g mixed peel (or finely chopped crystallised ginger, or other tangy dried fruit)
150ml milk
250g strong or high grade flour
2 Tbsp brown sugar
1 Tbsp dried yeast
1 tsp ground ginger
1/2 tsp ground cardamom
1/2 tsp ground cinnamon
1/4 tsp salt
grated zest of one orange
1/2 tsp vanilla
4 eggs, lightly beaten
140g unsalted butter, softened but NOT melted, and cut into little pieces

Put the dried fruit in a small heatproof bowl and cover with boiling water from the kettle. Leave to steep while you get everything else organised.
Put the milk in a small pan and bring to nearly simmering point, then remove from the heat and let cool to lukewarm.
Put the flour, sugar, yeast, spices and salt in a large bowl and stir well. Drain the dried fruit and set aside.
Pour in the milk, the orange zest, the vanilla, the eggs and the dried fruit. Beat well until you have a smooth batter. Set aside in a warm place until doubled - this will take about an hour.
Beat the risen batter until it deflates, then add half the butter and beat well with a wooden spoon until it is all mixed in and there are no lumps. Repeat with the remaining butter and beat until the batter is smooth.
Grease the holes of a 12-cup muffin pan with a little butter or oil, and divide the mixture between them.
Cover the tin with a plastic bag and put it in the fridge.
In the morning, turn the oven to 170C and take the tin out of the fridge. When the oven has reached temperature and the buns have lost their chill (about 35 minutes, in my house) put them in the oven and bake for 15 minutes, until risen and golden brown.
Leave them in the tin for five minutes, then gently ease out with a spatula. Makes 12.

Have a wonderful Easter, everyone x

Friday, April 04, 2014

Treat me: Homemade Easter eggs

I'm not really that keen on sweets or lollies, but it takes a lot of willpower for me to resist a marshmallow. This has been a lifelong problem - when I was about five I discovered a stash of marshmallows in a high cupboard and secretly scoffed the lot. I still remember the speech I got about how it was bad to take the marshmallows, but even worse to lie and pretend I hadn't. I've been a terrible liar ever since (and still feel guilty about indulging my marshmallow habit.)

How To Make Marshmallow Easter Eggs

Last weekend my friend Agnes came over and made a swag of beautiful Easter eggs while I found whatever kitchen tool she needed and kept our daughters out of the chocolate (one of those tasks was much easier than the other). Agnes and chocolate are like Picasso and paint - it's amazing watching her work. I was too embarrassed to make these eggs - the way I remember doing them with my mother - in front of her, but my taste for nostalgia (and marshmallow) meant I've been dreaming about them all week.

So if you've ever wondered how to make marshmallow Easter eggs at home without any fancy kit, this is how to do it.


Homemade Marshmallow Easter Eggs
Don't be alarmed - the flour and egg are only used in the shaping process. Both can be reused in the normal way. You need electric beaters, or preferably a stand mixer, to make the marshmallow. Don't attempt it with a rotary beater, it will only end in tears. This is a bit of a process but the results, which taste like chocolate-covered clouds, make it all worth it.

2 kg flour (use gluten-free flour if you have gluten woes)
1 egg - at room temperature (or the flour sticks to it)
1 Tbsp powdered gelatine
1/4 cup cold water
1/2 cup hot water
1 cups sugar
1/2 tsp pure vanilla
1/2 tsp rosewater
1 tsp lemon juice
Pink food colouring, optional
180g good quality chocolate - I used Whittaker's Fairtrade Creamy Milk
1 Tbsp coconut oil or other plain, flavourless oil

Spread the flour into two or three large, deep baking dishes. The flour needs to be about 5cm deep. Gently press the egg (in the shell) into the flour to make a half-egg shape to make 20 hollows. Carefully set aside.
Put the cold water in a small bowl and sprinkle over the gelatine. Stir well, then let swell for five minutes.
Put the hot water and the sugar in a large saucepan and stir over low heat until the sugar is dissolved. Add the gelatine mixture, stirring all the time, until it has dissolved too.
Bring this mixture to the boil and boil gently for six minutes. Remove from the heat and let cool until lukewarm.
Transfer it to a large mixing bowl (or the bowl of a stand mixer) and add the vanilla, rosewater and lemon juice. Beat on high speed until thick and creamy (about five minutes, depending on your mixer). If you like, add a few drops of pink food colouring when the mixture is nearly done.
Carefully spoon the marshmallow mixture into the egg shapes, making sure it comes to the top.
Let set for 15 minutes, then carefully remove the halves from the flour by touching the top of each one with your finger and lifting it out. Join the halves together (the top stays sticky, so they 'glue' together nicely) and dust off the flour. A pastry brush is helpful here.
Cover a tray with plastic wrap and set aside.
Leave the marshmallow eggs in a cool place while you melt the chocolate and coconut oil together in a double boiler over low heat. Let cool until lukewarm, then carefully dip the eggs in, using a fork or a dipping spoon, then put them on the plastic-covered tray. This is a messy job - just resign yourself to the fact that chocolate will go everywhere. When the eggs are covered (or as best as you can get them), put them in the fridge to set. Store them in a covered container in the fridge (wrap them in foil if you're really fancy). Makes 8-10 eggs, depending on how much marshmallow you eat in the process...

Given that this is such a chocolate-filled time of the year (in our house, at least), it makes great sense to add this post to April's We Should Cocoa challenge, where guest host Rachel Cotterill has chosen Easter as the theme.

Have a great weekend everyone x


Tuesday, February 18, 2014

Fried egg crumpets

About 20 years ago, when I had just moved into my first flat, my flatmate Geoff specialised in what he called 'egg windows' - a fried slice of bread with an egg in the middle of it.

Geoff's dad, an army major, had showed him how to make them when he was a kid and Geoff was a total pro. Then an architecture student, he cut the 'window' out of the bread with exacting precision, and he had the timing down pat. Alas, that was probably the apex of his cooking skills. His other memorable culinary moment was the time he came home drunk, put a tray of oven chips on to cook and fell asleep on the sofa. We were saved by the neighbours calling the fire brigade, but the chips were not so lucky.

I'd forgotten all about Geoff, egg windows and the fire until I saw Maya Adam show how to make what she called 'Egg in a hole' as part of the Child Nutrition MOOC run by Stanford University. Here was the egg window, transformed into a fast, nutritious breakfast for a child. It was genius. But even more genius is my fried egg crumpet - a fast, nutritious(ish) and utterly delicious anytime meal for everyone. Here's how to do it.

Egg In A Hole Using Crumpets

Fried egg crumpets
One of these might do for breakfast, but I think you need two for lunch. The holey nature of the crumpet means it soaks up a) butter and b) egg, so there are lots of textural contrasts - soft, silky egg and crunchy crumpet edges. Add something green on the side and you might even be able to call it dinner.

You need:
An equal number of crumpets and eggs - let's say two per person
A good knob of butter and a splash of olive oil to stop the butter from burning
A heavy frying pan with a lid
A round cookie cutter or small glass (about five cm in diameter)
Salt and pepper
Sriracha sauce or some other spicy condiment
Grated Parmesan, optional

Cut the middle out of the crumpets with the cookie cutter or glass. You can eat the middle bit as a cook's perk now, or toast it to eat later, or (sacrilege!) throw it away.
Melt the butter and oil in the heavy frying pan over medium-high heat. Put the crumpets in, holey side down, and cook for a couple of minutes, until golden. Flip over and let the smooth side cook for a minute.
Carefully crack an egg into the hole of each crumpet. Don't worry if some spills over the sides, this is no big deal. Put a lid on the pan and cook, covered, for about three minutes, until the egg white is set and the outer edges are getting nice and crunchy. Carefully flip over to cook the other side until it is just set to ensure a runny yolk (obviously cook it for longer if you prefer egg yolks to be firm).
Transfer to a plate and sprinkle with salt, pepper and grated cheese, if using. Dollop on the spicy sauce and enjoy!


Monday, April 01, 2013

Little & Friday's famous doughnuts

After a truly hectic month, in which I spent far too much time out of my kitchen (not to mention being slightly out of my mind), I spent most of Easter weekend pottering between stove, sink and vegetable garden. It was great.

I even managed to make a menu plan and I only made one emergency dash to the dairy (in which I bought the last bottle of cream in the eastern suburbs). I managed to use some of my recent cookbook acquisitions AND my fancy new cake tin. The cake I made in it was a disaster, but that's another story. My hot cross buns - Dan Lepard's spiced stout buns - turned out a little heavier than I expected too, but anecdotal evidence tells me that a lot of people struggled to make decent buns this year. Let's blame climate change, shall we?
Dan-Lepard-Hot-Cross-Buns
Buns, blue cheese and rose petal jelly
Anyway, today I achieved a longheld ambition and made the Cream Doughnuts from Treats From Little & Friday. For non-New Zealanders, Little & Friday is an Auckland cafe with a cult following. The cafe's owner/founder Kim Evans published a gorgeous book of some of her best recipes last year and I've been dying to make the famous doughnuts ever since. I won't reproduce the recipe here, but essentially you make brioche dough (about 900g flour, 3 eggs, 140g butter, milk, yeast, sugar, salt etc), which is then deep-fried (!) and filled with jam and creme diplomat (a half-half mixture of creme patissiere and whipped cream) until they are at near-bursting point. Then you roll them in icing sugar and eat them, until you are near bursting point (and covered with icing sugar).

Little-And-Friday-Brioche-Doughnuts-With-Creme-Patissiere

They are seriously, seriously good. I took a basket of them to an annual Easter bun-fest/chocolate frenzy at a friend's place and while the kids ran amok hunting Easter eggs, the adults just ate doughnuts and reclined with beatific expressions. I can't wait to make them again. But perhaps I'll sign up for the Wellington half-marathon first...

What did you make this Easter? Have you made the L&F doughnuts before?

Wednesday, March 27, 2013

What to do with leftover egg yolks

Last week I ended up with 14 egg yolks in my fridge. I'd like to say I had no idea how this happened, or that it was the work of a particularly talented flock of chickens, but in truth it was directly related to the three pavlovas that were cooking  v e r y   s l o w l y  in my oven. I'll tell you about them another day.

In the meantime, I want to share with you what I did with them. First, I considered doing what my mother-in-law does and tipping them down the sink. Then I came to my senses and asked Twitter for advice.


There were many suggestions relating to custard and hollandaise, but Jen of Blue Kitchen Bakes came up with the most useful tip: freezing them. I knew you could freeze egg whites, but making yolk iceblocks was new to me. Jen said to freeze them with a pinch of salt or sugar (depending on their final use) - so that's what I did with eight of them.

Four then went into dinner - I'd forgotten what a seriously easy and delicious dinner spaghetti carbonara is: four egg yolks stirred together with a good splash of cream (maybe four tablespoons?), some Parmesan, some finely chopped parsley and some crispy bacon or ham tossed through hot spaghetti.

Two somehow ended up on the floor - oops - but if they hadn't I could have made mayonnaise or used one as a face mask (egg yolks are full of vitamin A, which is found in all the best beauty treatments, don't you know?). Or if we had a dog I could have mixed an egg yolk into its dinner for a pelt-improving protein boost.

But the next time I end up with a bunch of egg yolks - or at least 10 - I'm going to make like my lovely friend Andy suggested and whip up this creme brulee ice cream. Well, wouldn't you?

What do you do with leftover egg yolks? Or whites, for that matter?

Monday, February 11, 2013

Pancakes, 1970s style

Given that it's Shrove Tuesday tomorrow, I thought it was about time I showed you a pancake-related relic from my childhood....

No, that's not me, though I did think the woman in the foreground was very glamorous. It's a shot from the box of the Monier Crepe Maker, straight out of the 1970s.


I don't recall my parents hosting huge crepe-related soirees, though I do remember Mum using it occasionally (and letting me use it, when I was deemed responsible enough. I definitely remember reading the accompanying recipe booklet and wishing we could have Crepes Suzette. I was less keen on some of the other suggestions, such as 'moistening a little corned beef with milk, then wrapping it in a crepe'.
It might seem a ridiculous, mono-use tool, but after trying it out yesterday I can confirm that it really does work just as easily as the box claims it will. Not bad for something that must be at least 35 years old (according to this Sydney Morning Herald advertisement). I've never been particularly good at making light, lacy crepes, but switching on the Monier yesterday gave me new confidence. Maybe it was the recipe on the box.

Monier Crepes
All batters are better after a resting period, but this one was good to go after 10 minutes. I've yet to try it out in a normal pan, but I'm sure it would still be fine, you just won't look as cool as I do when you make them.

3 eggs
1 cup flour
pinch of salt
2 Tbsp butter, melted
1 cup milk

Whisk the eggs and flour together, then slowly add the milk and melted butter until you have a smooth batter. Rest in the fridge for at least 10 minutes before using. Makes about a dozen crepes.

Is there a Monier Crepe Maker in your past? What's the secret to your best pancakes?


Friday, February 08, 2013

Treat me: Lemon meringue ice cream

I don't know what is wrong with me but all of a sudden I have become the world's worst maker of meringues.
I've made two batches now that have gone from fluffy peaks of snow-white mixture to dull beige piles and I've lost my nerve completely.
It might be my oven, which doesn't do low temperatures very well (surprising, given that the door has taken to falling open of its own accord). Anyway, the good thing about this is that I've worked out a really good way to use up my meringue disasters.


Lemon meringue ice cream
Don't worry - you don't need to go through the trauma of making a deliberately bad batch of meringues to make this ice cream. In fact, you don't need to make them at all. But you do need meringues of some sort (I won't judge you if you buy them) to fold through this tart, marmalade-streaked frozen wonder.

110g icing sugar
140ml (1/2 a cup plus 1 Tbsp) lemon juice
300ml cream
1/3 cup good lemon curd or marmalade
6-8 meringues, crumbled

Put the lemon juice and icing sugar in a large bowl and stir to dissolve the sugar. Add the cream and whisk until it forms soft peaks. Fold in the marmalade or lemon curd and crumbled meringues.
Pour into a lidded plastic container and freeze for at least four hours. Let soften for five minutes out of the fridge before serving.
If you want to be really fancy, pour the ice cream into a loaf tin lined with cling film. Top with a layer of marmalade or lemon curd, then a layer of meringues (obviously, you'll need more of both if you're doing it this way). Cover loosely with plastic and freeze as above. To serve, lift the whole contraption out of the loaf tin, whisk away the plastic wrap, and transfer to a serving platter.

Have a great weekend, everyone. If you have a fail-safe meringue recipe, especially one designed for temperamental ovens, I'd love to see it...

Wednesday, February 06, 2013

Grapefruit curd

You know how lemon curd is always so painstaking to make, with all that double-boiler anxiety and fretful stirring? It doesn't have to be that way.
I had an epiphany in the weekend after coming across Stephanie Alexander's revolutionary method. As so often happens with The Cook's Companion, I was looking up something else when I stumbled across her lemon curd recipe. In it, she dismisses the received wisdom that it needs gentle heat and patience and instead gives some short-cut instructions.

I was a bit nervous - it's a bit like setting out on a half-marathon to have some geezer pop out from behind a bush and say, 'look love, here's a short-cut that will get you there in half the time' - but I can confidently report that it works a treat. I'll possibly never remember what I was looking for to start with, but with this kind of knowledge now under my belt I'm not too bothered.

Easy Way To Make Grapefruit Curd

Grapefruit Curd
Did you know that if you Google 'grapefruit' most links are for the 'Grapefruit Diet'. I find this profoundly depressing. Instead, I'm prescribing a course of the Grapefruit Curd Diet. Try some of this on your toast and see if you don't feel better about life. Don't worry about the butter and eggs, think of the vitamin C! The recipe is adapted from the one mentioned above in The Cook's Companion, one of my most used, most loved books.

4 free-range egg yolks
2/3 cup caster sugar
100ml freshly squeezed grapefruit juice (one or two grapefruits should do it)
finely grated zest of two grapefruits
60g butter, diced

Put the egg yolks and sugar in a small pot and beat together until well blended. Add the grapefruit juice and zest, and the butter. Put the pot over medium-high heat and stir constantly until it comes to simmering point. As soon as the bubbles appear, remove from the heat. Keep stirring for another minute or so, then pour into sterilised jars. Makes about 450ml. Refrigerate when cold.

Now, I know you're thinking, 'but what will I do with four egg whites'? I have the perfect answer for you, but you'll have to wait until Friday. Put them in a plastic lidded container and freeze them while you await further instructions.

Happy Waitangi Day to fellow New Zealanders everywhere. Hope you are celebrating with some appropriate feasting, whether it's pipis and paua, asparagus rolls and whitebait fritters, roast lamb or a hangi. Cheers!


Monday, November 26, 2012

Random recipes #22 : Picnic Eggs

After the horror that was October's Random Recipe, I was a bit wary of taking part this month. But considering we were having a quiet weekend at home (apart from shrieking at Downton Abbey), I figured I could cope with another disaster. Then I opened page 38 of '250 Ways To Serve Eggs' - sample recipes: Egg And Liver Ring, Egg And Liver Salad, Pickled Eggs - and nearly passed out.


This book is one of my most recent acquisitions and, dodgy recipes aside, I am very proud of it. I bought it, along with its 23 companion volumes, for a dollar (thanks, Trade Me!) about two months ago. These books are edited by the Culinary Arts Institute and they are a fantastic snapshot of American food culture in the 1960s and 70s. There's not even a whiff of social change in these pages - it's all about ways to show "the alert homemaker" how she can "add interest and delight to the family menu". Some of the recipes are hideous - Body Building Recipes For Children is especially revolting - but there are some surprisingly good things too. Like this recipe for Picnic Eggs, which I turned to after I recovered from reading p38.


Picnic Eggs
Did you know that if you Google 'how to boil an egg' nearly 11 million results come up? How did people learn these things before the internet, do you think? I wish the cooks at my high school had been able to access it - the hardboiled eggs they made were cooked for so long the yolks had turned to dusty grey powder and the whites nearly bounced.
There's a great method here - from a Le Cordon Bleu chef, no less - but his egg still looks a little dry for my liking. I used a Ruth Pretty method when cooking these eggs - bring a pot of water to the boil, add salt, then add the eggs, one at a time. Lower the heat so the water isn't boiling so ferociously, then cook for eight minutes exactly. Drain the eggs, bash the shells a bit in the pot and leave under cold running water until cool enough to handle so you can shell them. This gives you eggs with perfectly soft-but-not-runny yolks.

4 hard-boiled eggs, peeled and halved lengthways
1/4 tsp salt
1/2 tsp dry mustard
a pinch of cayenne pepper (Togarashi Shimchi would be nice here too)
1 tsp vinegar
1 Tbsp very soft butter

Gently remove the yolks from the eggs and put them, along with all the other ingredients, in a small bowl. Mash together until smooth, then spoon this mixture back into the whites. Either serve immediately, or, if going on a picnic, press the halves back together and wrap carefully in greaseproof paper (twist each end so it looks like a giant sweet). Coriander flowers look sweet (and taste good) as a decorative touch.

For more about Random Recipes, you need to see the nice man at Belleau Kitchen. For more fun with eggs, you can have a bit of fun playing spot the difference between a boiled egg and Heston Blumenthal.

How do you cook boiled eggs? And have you ever seen volume 25 of the Culinary Arts Institute series, 500 Ways With Cocktails? I am desperate to complete my set...


Wednesday, October 31, 2012

The crunchy, crusty omelet

At least once a week the Small Girl and I have an intimate dinner a deux. A ladies' night in, if you will. It's every bit as relaxing as you can imagine an occasion where one of the participants is tired and cross after a long day in the sandpit and the other has run home, jumped in the shower, waved their spouse out the door and set about cooking dinner, fast.
On these nights, we have a special treat for dinner: cobletts. No, don't go to the Larousse to look it up - a coblett is what omelets are called at our place. The shocking revelation by my husband recently that he didn't know how to make one (deprived childhood, I blame his parents) made me determined to get our daughter up to speed. I'm not making her hold her bare wrist over the gas flame to ensure the omelet is suitably runny, but she's got the egg mixing ("just a little bit, Mummy") down to a fine art.
But because no girl can live by ordinary cobletts alone, we have started getting fancy. Here's the latest version, a crouton-stuffed coblett inspired by Ferran Adria's crisp omelet.
 
 
The crunchy, crusty omelet
This is perfect if you live in a household that's bread-rich and time-poor. Or you just happen to like bread. And eggs. I'm sure you all know how to make an omelet but I include some instructions here in case my husband wants to learn.
 
For one person:
 
Take a couple of slices of bread - the crust from the end of a loaf, or the heel of yesterday's baguette - and cut or break into small pieces (about 1.5cm, if you're being pedantic).
Drizzle these with olive oil and bake in the oven for 10 minutes, until crisp and golden. Set aside while you break two eggs into a small bowl and stir them with a fork. If you like cheesy omelets, now's the time to grate some good cheese and set it aside too.
Heat a good knob of butter in a small frying pan. When it foams, pour in the egg mixture. Let it set for about 10 seconds, then take a small spatula and lift up the edge on one side and let the runny mixture underneath. Continue doing this until most of the liquid has set - except for on the top. Scatter the crunchy croutons and cheese on one half of the omelet, then fold the other half over the top so you have a semi-circle. Let sit in the pan over gentle heat for about 10 seconds, then slide onto a plate. When you cut into it, the omelet will be the perfect mixture of soft and crunchy textures.
 
What's your favourite 'instant' dinner?

Wednesday, June 13, 2012

The definitive whitebait pattie

Last week the Small Girl and I took our lives in our hands and flew down to the West Coast for a few days. I don't know why people pay huge sums to parachute or bungy jump when they come to New Zealand - merely taking off from Wellington airport in a small plane in a storm is enough to give you all the adrenaline boost you need, with a handy top-up when you land practically on the beach at Westport.
As if that wasn't stressful enough, I then had to turn my hand to cooking whitebait fritters for a household who can remember when whitebait was so plentiful people used to put it on their gardens for fertiliser (and they say Coasters aren't environmentally aware!)

Actually, that's not strictly true. Following my mother-in-law's instructions, I made the batter and my brother-in-law (showing hitherto unknown talents) cooked them. This is how to do it.


Whitebait patties
As previously mentioned, West Coasters catch (or buy) whitebait in pounds, which then get cooked in patties (not fritters). Two pounds-worth makes enough patties for four hungry adults, with the leftovers fought over for whitebait pattie sandwiches the next day.
2lbs whitebait
5 eggs
1/2 cup plain flour
1/2 tsp baking powder
pinch salt

First, catch your whitebait. Then rinse it carefully while listening to stories of how much better it is now that raw sewage no longer flows into the Buller River. Set aside.
Whisk the eggs and dry ingredients together to make a smooth batter, then stir in the whitebait.
Melt a generous knob of butter in a heavy frying pan. Cook the patties as if they are pikelets until golden on both sides. Serve with lemon wedges.


Wednesday, February 29, 2012

Egg 'n chips

Which came first, the chicken or the egg? Well, in our house, it was the chicken. But the Boy Wonder has had another moment of genius since then.

We were going to have a salad of greens, eggs and ham, accompanied by the BW's famous chips, but he undercooked the eggs a bit. Instead, we whipped them into eggcups and dipped the wedges in them instead. Just heavenly, if probably not very good for one's cholesterol. But you only live once, right?