Showing posts with label Condiments. Show all posts

Tuesday, February 02, 2016

Lemon verbena syrup + an elegant fruit salad

Four years ago, not long after my mother died, someone I didn't know very well left a lemon verbena tree on our doorstep. I found this gesture incredibly touching and kind, not least because my parents' garden had a huge lemon verbena tree and Mum often made tea from the leaves. I'm not sure if I ever properly thanked her - but Kate, if you're reading this, I often think of that kindness when I walk past the tree.


The tree has thrived, despite my neglect, but I seldom do anything with the leaves except for the occasional cup of tea. Then, while pottering around in the kitchen a week or so ago, I made this syrup and the whole house smelled like lemon verbena. It was gorgeous.

If you've got a lemon verbena tree, make this syrup now to get a dose of that intense lemony sherbet flavour in the depths of winter (or scent your house with it in summer). You can use it in drinks (nice with soda, or with very cold vodka as a kind of martini-ish number), or pour it over vanilla ice cream, or use it in this simple and elegant fruit salad (recipe follows). I'm thinking a lemon verbena sorbet could be next...

Lemon Verbena Syrup

1/2 cup boiling water
1/2 cup caster sugar
1 packed cup lemon verbena leaves

Put the water and sugar in a small pot and set over medium heat. Stir until the sugar has dissolved, then lower the heat and add the lemon verbena. Let bubble gently for five minutes, then remove from the heat and leave to cool.
When the syrup has cooled completely, strain it through a fine sieve into a sterilised bottle or jar. Discard the lemon verbena leaves or use them as a garnish (they will be almost candied). Makes about 1/2 cup.

Simple fruit salad with lemon verbena syrup
2 white-flesh peaches
2 apricots
2 dark-fleshed plums
1 1/2 cups blueberries (or boysenberries)
1/4 cup lemon verbena syrup

Cut all the stonefruit into slim wedges - about eight slices - and put in a bowl. Pour over the syrup and stir gently, then add the berries. This can be done in advance, but I think it's nicest at room temperature rather than fridge-cold. Serves 4-6.


Friday, November 20, 2015

The one secret sauce you'll use all summer

Want a simple sauce you can use on just about anything? Look no further. This stir-together sauce takes about two minutes to make and enlivens all kinds of dishes. It's good with cold chicken, as a side sauce for fish or prawns. You can also try it with very cold soft tofu or soft-hard boiled eggs. There's just one piece of advice: don't share this sauce recipe with anyone, or you'll be drowning in it by the time summer ends. It's THAT good.


Secret spicy sauce
The trick to this is using good quality curry powder. Other than that, there's not much to it.

1 Tbsp hot curry powder
1 Tbsp freshly squeezed lemon juice
1/2 cup Greek yoghurt
1/4 cup mayonnaise
salt and pepper

Put the curry powder and lemon juice in a bowl and mix to a paste. Beat in the yoghurt and mayonnaise, then taste for seasoning - it may need a little salt, or a little more lemon juice. Store, covered, in the fridge for up to a week.

Have a great weekend everyone x


Friday, May 29, 2015

Miso-roasted pumpkin

It's funny the things that stick in your head. For example, the sole thing I remember from the Queen's last visit to New Zealand (don't ask me when it was, I'm not that much of a royalist) is that she requested pumpkin to be served at a dinner at Huka Lodge.

This always struck me as weird, a bit like when Kate Winslet was found shopping in Pagani in Masterton. Because as much as I love pumpkin, it's not particularly fancy. Maybe that's what Queenie likes about it - perhaps she tires of foie gras and roasted grouse and longs to eat roast pumpkin in front of Coronation St. (There's still no explanation for Kate and Pagani. None.)

In any case, with the long weekend in the Queen's honour approaching, here's a recipe for pumpkin that's fit for royals and commoners alike.

Miso-Roasted-Pumpkin The Kitchenmaid/Lucy Corry

Miso-Roasted Pumpkin
This is a very easy way to make pumpkin more exciting. If you don't like pumpkin, try stirring this miso butter through hot rice - instant comfort food.

1 kg crown pumpkin, cut into six wedges (leave the skin on)
50g unsalted butter
4 Tbsp white miso paste
cracked pepper

Heat the oven to 200C and line a small roasting dish with foil.
Put the pumpkin on the tray.
Beat the butter and miso together until soft and spreadable, then pat onto the pumpkin. Grind over lots of black pepper and bake for 30-40 minutes, until the pumpkin is cooked and the miso butter has browned.

Have a great weekend, everyone x

Thursday, November 27, 2014

Random recipe: Tofu mayonnaise

You know what gets me about fancy houses in interiors magazines? They never, ever, have anything stuck to their fridges. Oh, sure, there might be some artful magnetic chalkboard,  or a designer decal, but there are never any library book notices, or 'art' or torn-out recipes. They are neat, tidy - and soulless.

By contrast, the outside of my fridge is extremely busy (and a direct reflection of the chaos inside). Magnetic newspaper headlines, school notices, drawings, business cards for builders and a motley collection of recipes ripped from newspapers or magazines. I was just about to add another one to the pile last week when I remembered this month's Random Recipes, which celebrates those torn-out clippings. So instead of consigning the recipe to the fridge door, where it would probably be lost forever, I made it that night instead. I should really do this more often.

Easy Vegan Tofu Mayo Recipe

Tofu Mayonnaise
I knew Aaron Brunet would win Masterchef in 2013 - right from the start he had that look about him. This mayonnaise recipe was from a recent newspaper column he wrote about the pleasures of eating with your hands - in which he endorsed plate-licking. Now, I had a flatmate once who licked her plate after eating and I don't ever want to see that again, but his recipes are definitely finger-lickin' good. Aaron uses this mayo in a chicken caesar-ish wrap - I used in our Friday night fishburgers and to lie beneath some hot smoked salmon on crackers. I've now lost the clipping somewhere, but this is the recipe from memory (ish). It's dead easy, good for you and adding some fresh herbs gets rid of any tofu flavour. You should try it.

300g block silken tofu
2 tsp Dijon mustard
2 tsp Kikkoman soy sauce
salt and pepper
½ tsp pepper
1 Tbsp extra virgin olive oil
2 Tbsp freshly squeezed lemon juice
Fresh herbs - finely chopped parsley, chives, basil (optional)

Put all ingredients, except the herbs, in a blender and blitz until smooth (I use a stick blender and a jar). Taste for seasoning and sharpness - add more salt or lemon juice as desired. If you're planning to use it all immediately, add the herbs and blitz again. Otherwise, this keeps in the fridge for a week.

Monday, November 24, 2014

Really good peanut salad dressing

I'm not sure it's the sort of thing Oprah writes in her gratitude journals, but every day I thank my stars that no one in my household has a nut allergy. Quite apart from the threat of anaphylaxis, I can't imagine life without peanut butter. Actually, I can barely imagine a day without it. 

Peanut butter - especially proper peanut butter, like the excellent varieties springing up everywhere in New Zealand now - is a major food group in my house. Peanut butter and banana on toast is my hurried breakfast (and sometimes, lunch) of choice. It's a handy tahini replacement in homemade hummus, works well in a marinade and is a major baking ingredient. It's also a nifty addition to a salad dressing to perk up broccolini and other assorted bits and pieces. Add this to your weeknight repertoire for those nights when peanut butter and crackers seem like the only viable dinner option.
 

Really good peanut salad dressing
This is child's play to make and it's really useful. I think it's good with steamed broccolini, but you could add all sorts of crunchy greens and some cooked chicken or tofu for a very family-friendly dinner. 

1 clove garlic, crushed with 1/2 tsp flaky salt
2 Tbsp apple cider vinegar
2 Tbsp freshly squeezed lemon juice
2 Tbsp good quality peanut butter
1/2 cup good quality peanut oil

Put all ingredients in a screwtop jar, attach the lid and shake well until emulsified. Makes about 1 cup - easily enough for a substantial salad for 4-6 people - and stores well in the fridge.

If you prefer your peanut butter treats to be a little more decadent, then this peanut butter pie should fit the bill (though you won't be fitting much after eating it). 

*My clever friends at Kiwi Mummy Blogs have teamed up with the nice people at Pic's Really Good Peanut Butter to collate some Really Good peanut butter recipes. You can get more peanut butter inspo here.*

Thursday, May 08, 2014

How to make the perfect viniagrette

Q: Why did the tomato blush?
A: Because it saw the salad dressing.

I've always loved that joke, partly because it's about the only punchline that I can remember. But all jokes aside, some people should blush with embarrassment at their salad dressings. Paul Newman, I'm looking at you. Whoever makes the salad dressings at several Wellington restaurants that I've visited recently should also take a good look at themselves.

How To Make Vinaigrette

The thing is, you don’t need to be a super chef to make a good salad dressing, but plenty of people do a great job of making bad ones. If in doubt, remember that condensed milk is best saved for baking and that no amount of secret herbs and spices will disguise cheap oil and nasty vinegar. A lot of people ask me how to make a basic vinaigrette (that's vin-AY-gret, not vinegar-ette - which sounds like the sort of perfume worn by sour little French women) so I've devised this handy guide. Here's how...

Vinaigrette Easy Recipe

How To Make Vinaigrette
Jamie Oliver once put out a special sort of gadget for making salad dressings but all you need  is a clean and empty jam jar, or a small bowl and a fork.
You can vary the acid and the oil to suit your preferences, your pantry supplies and what you're going to use the vinaigrette for. I most often use lemon juice and apple cider or red wine vinegar with extra virgin olive oil. A good pinch of cumin seeds can be a good addition, or finely fresh herbs. If you're using herbs, the vinaigrette is best used that day. Otherwise it will happily keep in the fridge for a couple of weeks.
Having a jar of vinaigrette in the fridge makes that after-work dinner dash much easier. Even though it only takes minutes to make, knowing you can pull some salad leaves out of a bag (or the garden) and dress them with something you've prepared earlier makes dinner time seem less daunting. I also use vinaigrette on steamed beans and carrots, shredded beetroot and new potatoes.

First, peel a clove of plump, juicy garlic and put it on a chopping board with a good pinch of salt. Using the blade of a knife, crush the clove with the salt to form a smooth paste. Scrape this off the chopping board and put it in a clean, dry jam jar (or a small bowl).
Add a teaspoon of honey (or brown sugar) and a teaspoon of mustard (Dijon for preference, English for wow factor).
Add 2 1/2 tablespoons of vinegar/lemon juice and six tablespoons of extra virgin olive oil, then screw the lid on the jar and give it a good shake. Taste it for seasoning and sharpness - does it need more salt? more oil? more vinegar? a pinch of sugar to balance the flavours? - before using.

What's your favourite salad dressing?

Monday, March 17, 2014

Miso and lemon mousetraps

Do you remember mousetraps from when you were a kid? I couldn't wait to make them when the Small Girl was smaller, mainly so I could eat them myself. There's something about salty, savoury Marmite that goes so well with slightly scorched bread and cheese. But I've found something that goes even better - a mega-umami hit of miso. I know it sounds unlikely, but one bite and you'll be hooked. The only thing that makes it better is a squeeze of fresh lemon juice on top. Trust me, it's a winner.

Miso And Lemon Mousetraps Photo And Recipe Credit: Lucy Corry/The Kitchenmaid

Miso and lemon mousetraps
The beauty of these mouth-watering morsels is that you can make a whole trayful to serve with drinks when  you are unexpectedly pressed into hostess service, or you can make a whole trayful and call it dinner on those nights when all you want to do is collapse on the sofa. You can use any kind of bread you like - baguette, a coarse-textured country loaf or even a cheeky gluten-free number, but nothing too wholegrain-y. Keep the slices about 1/2 a cm thick for best results and only toast one side so you get the soft/crunchy texture thing happening. I've kept quantities vague, but keep to the suggested ratio of miso to butter. Don't forget the lemon, either. Any leftover miso-butter mixture can be kept in a covered container in the fridge.

sliced bread, as above
1/2 cup white miso
1/4 cup unsalted butter, softened
50-100g tasty cheddar cheese, finely grated
1 juicy lemon

Preheat the grill and line a baking tray with foil or baking paper. Lie the slices of bread on top, then put under the grill until golden. Don't do what I do and wander off, unless you have an unlimited supply of bread to replace the charcoal that those forgotten slices will become. Take the tray out of the oven and turn the slices over, so the toasted side is facing down.
Put the miso and butter in a small bowl and mix until well combined. Generously spread the non-toasted side of the bread with this mixture, then scatter some grated cheese on top. Return the tray to the grill and toast until the cheese is crispy and the edges of the bread are darkening.
Let cool briefly before serving with a squeeze of lemon on top.  These are best eaten the day they are made.

Wednesday, January 08, 2014

Kitchen DIY: Homemade capers

Do you want your neighbours to think you have gone mad? Here's how.

1. Venture out to the council-managed garden areas (that is to say, those that are overgrown with weeds) on your street, preferably while wearing your gardening hat, gumboots and various other items of misshapen, mismatching clothing.

2. For best results, do this when your neighbours are walking up the street, preferably with their most glamorous friends and perfectly behaved children, in their best clothes.

3. Climb into one of the gardens and start pinching off nasturtium buds and flowers, putting them in the small bowl you have brought with you for this purpose.

4. Wave cheerily as the neighbours pass by. Tell them, when they enquire as to what you are doing, that you are picking the nasturtium buds to make into homemade capers and the flowers are going in tonight's salad. Watch as the smiles become a bit more fixed and the stares become more glassy.

5. Scramble out of the garden and go to your house, while the net curtains across the street twitch frantically.

Well, that's not completely accurate - our neighbours are all lovely and very few of them have net curtains. Actually, only the really weird ones have net curtains and we think it's because they are Up To No Good In There. I do feel a bit of a dork to be sprung essentially harvesting weeds in front of them, but they should be used to it by now. In any case, I love nasturtiums and a bit of embarrassment is worth it.

Homemade Capers

Pickled Nasturtium Buds - aka Homemade Capers
Nasturtium flowers are great in salads and the leaves add a peppery bite to cream cheese and cucumber sandwiches - just pick the smaller ones as the big ones are really fiery. When the flowers have wilted (or been picked by someone like me), pick the little brain-like growths at the base of the flowers and use them in this homegrown version of capers.

At least 1/2 a cup of nasturtium buds, washed and dried
250ml rice wine vinegar
1 tsp salt
1 clove garlic
10 peppercorns

Put the vinegar, salt, garlic and peppercorns into a small saucepan and bring to the boil. Simmer for two minutes, then remove from the heat and let cool. Pour into a small sterilised jar, then add the nasturtium buds. Put a lid on the jar and leave for a couple of weeks in a cool place. The buds will be ready to eat when they have sunk to the bottom of the jar. You can keep adding new buds to the liquid.

Are you a forager? What's your best tip?

Wednesday, September 25, 2013

Green peppercorn sauce for cheats

I pulled a packet of frozen peas out of the freezer yesterday and something heavy shot out from underneath them and landed on my foot. I uttered a string of epithets not suitable for a family-friendly food blog and bent down to pick it up. Was it a brick? Was it a small frozen animal? Was it that packet of wonton wrappers that I've been planning to use for ages? In fact, it turned out to be three small pieces of fillet steak. Hurrah! I nearly lost a toe, but I gained an excellent dinner. It seemed like a fair trade to me.


Green peppercorn sauce - the cheat's version
When I told my beloved we were having steak for dinner he looked like I'd dropped the frozen meat on his foot. He perked up a bit when I told him it was fillet, then he perked up even more when I told him I'd make his favourite green peppercorn sauce. But somewhere between making the offer and dinnertime I got sideswiped by such fatigue that I couldn't face all that faffing about with reductions and whatnot. Instead, I made this in all of five minutes and it was so good I don't think I'll ever go back to the other one. If you're not a carnivore, rest assured this is equally good on baked potatoes or bread.

100g unsalted butter, softened
2 cloves of garlic, finely chopped
a good pinch of salt
4 tsp green peppercorns in brine

If you have a mortar and pestle, now's the time to use it. If you don't have a mortar and pestle (or you do and you just don't have the energy), this is easy enough to do by hand. Put the garlic and salt in the mortar and pound away until it forms a smooth paste. Add the peppercorns and smash them a bit, then add the butter and mush it around a bit. Scrape it on to a piece of waxed paper and roll into a cylinder. Stick it in the fridge to firm up - for at least 15 minutes. When your steak or potatoes or toast is ready, slice the butter into discs and put on top. Buttery, peppercorny heaven awaits. If you don't have a mortar and pestle (or you do and you just don't have the energy), this is easy enough to do by hand.

What's your favourite sort of butter?

Monday, May 06, 2013

Kitchen DIY: Homemade date syrup

I realised, slightly late in the piece, that it was a bit irresponsible to post a recipe for something using homemade date syrup without actually sharing how to make it. So, without any further ado, here's how to make date syrup at home.

Easy Homemade Date Syrup

Homemade Date Syrup
This is quite different to storebought date syrup, sometimes called date molasses, which is cooked down to a more syrypy consistency. The DIY version has a fresher, slightly less sweet taste - and it's still good to eat by the spoonful.

1 cup (about 200g) dates, chopped
1 cups (250ml) boiling water

Put the dates in a small, heatproof bowl and pour over the boiling water (add a little more if it doesn't quite cover the dates). Cover and let stand overnight or for at least eight hours.
The next morning/when you get home from work, put the soaked dates and water into a food processor or blender and whizz until smooth and well combined.
Scrape this mixture into a clean jar and store in the fridge.

Friday, May 03, 2013

Treat me: Double date scones

About 18 months ago I had a real thing for date syrup. I'd discovered it in one of those funny grocer-cum-spice shops where the vegetables are all rotting and the shelves are stacked high with things the casual Western European customer may struggle to identify. Even buying the date syrup was a gamble - the label was in French and Arabic and the picture on it was of three camels ambling through a desertscape. Actually, the camels were a dead giveaway - after buying Iranian 'Camel' brand dates for years, I figured there was a good chance that this glossy brown syrup was date-based too.

Anyway, date syrup and all the things I made with it had become a sweet memory until a couple of weeks ago when the lovely Laura Faire emailed to ask where I bought mine from. I sent her a few suggestions for stockists, but she went one further and sent me a DIY recipe. Not only does it work a treat, it means I no longer have to worry that the date syrup I use might actually be made from camels.

Homemade date syrup is less, well, syrupy than the bought version, but it does the trick just as well. Try it on porridge, drizzled over yoghurt, or in these double date scones.


Double date scones
I made these yesterday morning when I realised we had slim pickings for breakfast. They are so easy and using spelt flour makes them very easy to eat. That is to say, a small child and her mother can easily gobble down quite a few of them without feeling in the least bit weighed down.

300g (2 cups) white spelt flour
4 tsp baking powder
1 1/2 tsp mixed spice
1 cup dates, chopped
1/4 cup date syrup
1 cup cream

Heat the oven to 210C and put a baking tray in the oven.
Sift the flour, baking powder and spice into a large bowl. Stir through the chopped dates.
Mix the date syrup and cream together and pour into the dry ingredients. Fold together gently and quickly to make a soft dough. Turn out onto a piece of baking paper and shape into a rough rectangle, then cut into eight pieces. Transfer the baking paper and scones to the hot tray in the oven and bake for 10-12 minutes, until risen and golden.
Eat with lashings of butter or dollops of ricotta and honey.


Have a great weekend, everyone x

Monday, April 15, 2013

Smoked salmon and wasabi pate

The man of the house is currently brushing up on his French skills and this means getting me to help him with his homework. Once upon a time, this would have been easy, but the passing of time means my brain doesn't operate in French as well as it used to (or, indeed, as I imagined it once did). I've been feeling quite depressed about this, but am consoling myself with the fact that my menu French is still better than his. And when I looked up the Larousse to get a proper dictionary definition of 'pate', I didn't need another dictionary to explain the answer. So I can't be too badly off, can I?

Smoked Salmon And Wasabi Dip

Smoked salmon and wasabi pate
For the record, Larousse defines 'pate' as 'preparation de charcuterie de texture tres variable et composee de viandes et d'abats en morceaux ou en pate fine et de differents ingredients' and you don't need to know much French to figure out that there are (mercifully) no 'viandes' (or 'abats' - organs) in a smoked salmon version. But I had to call it something other than 'a sort of spread-y thing you can have on toast or crackers or on little bits of cucumber like an 80s canape', didn't I?
This is inspired by something in Jamie Oliver's book on British food - he makes something similar with smoked trout and horseradish and serves it with baby Yorkshire puddings. And cor blimey, guv'nor, it is bloomin' lovely. Or c'est absolument delicieux, as our French friends would say.

150g cream cheese, softened
1/4 - 1 tsp wasabi paste
150g hot smoked salmon
finely grated zest of a lemon, plus its juice
a couple of teaspoons of finely chopped dill or mint

Put the cream cheese, lemon zest and 1/4 teaspoon of wasabi in a small bowl and beat with a fork until smooth. Taste it for hotness - the wasabi should be present, but not overpowering. Keep adding it until you think it's about right. Flake in the hot smoked salmon and dill or mint. Fold it into the cream cheese, adding a little lemon juice if it seems a bit stiff. Taste again for seasoning - add some salt and freshly cracked black pepper until the balance is right. Scrape into a little bowl and cover, then store in the fridge. Makes enough for six people as a canape, with enough for one lucky person to have on toast the next morning.

Bonne semaine, tout le monde!

Wednesday, February 06, 2013

Grapefruit curd

You know how lemon curd is always so painstaking to make, with all that double-boiler anxiety and fretful stirring? It doesn't have to be that way.
I had an epiphany in the weekend after coming across Stephanie Alexander's revolutionary method. As so often happens with The Cook's Companion, I was looking up something else when I stumbled across her lemon curd recipe. In it, she dismisses the received wisdom that it needs gentle heat and patience and instead gives some short-cut instructions.

I was a bit nervous - it's a bit like setting out on a half-marathon to have some geezer pop out from behind a bush and say, 'look love, here's a short-cut that will get you there in half the time' - but I can confidently report that it works a treat. I'll possibly never remember what I was looking for to start with, but with this kind of knowledge now under my belt I'm not too bothered.

Easy Way To Make Grapefruit Curd

Grapefruit Curd
Did you know that if you Google 'grapefruit' most links are for the 'Grapefruit Diet'. I find this profoundly depressing. Instead, I'm prescribing a course of the Grapefruit Curd Diet. Try some of this on your toast and see if you don't feel better about life. Don't worry about the butter and eggs, think of the vitamin C! The recipe is adapted from the one mentioned above in The Cook's Companion, one of my most used, most loved books.

4 free-range egg yolks
2/3 cup caster sugar
100ml freshly squeezed grapefruit juice (one or two grapefruits should do it)
finely grated zest of two grapefruits
60g butter, diced

Put the egg yolks and sugar in a small pot and beat together until well blended. Add the grapefruit juice and zest, and the butter. Put the pot over medium-high heat and stir constantly until it comes to simmering point. As soon as the bubbles appear, remove from the heat. Keep stirring for another minute or so, then pour into sterilised jars. Makes about 450ml. Refrigerate when cold.

Now, I know you're thinking, 'but what will I do with four egg whites'? I have the perfect answer for you, but you'll have to wait until Friday. Put them in a plastic lidded container and freeze them while you await further instructions.

Happy Waitangi Day to fellow New Zealanders everywhere. Hope you are celebrating with some appropriate feasting, whether it's pipis and paua, asparagus rolls and whitebait fritters, roast lamb or a hangi. Cheers!


Friday, January 25, 2013

Treat me: DIY Speculoos spread

When I was a proper journalist (the sort that actually went out of the office and talked to real people) I'd often stumble upon fantastic charity shops in the middle of nowhere. If time allowed I'd sneak off to them after the interviews were done - while the old ladies who staff these shops are great sources of local knowledge it's hard to concentrate on finding treasure when you've got an interview looming.

These days, stuck at my desk, I'm reduced to finding fun things on the internet in the course of my research. It's not quite as good, but you can unearth lots of gems all the same. Take speculoos spread, for example. I started reading about it while researching recipe formats last week. It was totally new to me, but it's apparently 'Europe's alternative to peanut butter' and caused much excitement when Waitrose started selling it in the UK late last year.
The real thing is made from ground-up Speculoos cookies - with a few other ingredients - and is said to be as addictive as Nutella. My DIY version is much simpler, you can make it from everyday ingredients and it's just as habit-forming.

Speculoos Spread And Crumpets

Speculoos spread
I have no idea what 'real' speculoos spread tastes like but this is absolutely delicious - like eating raw gingerbread but without the attendant stomach ache. I've been eating it on hot crumpets, but it would transform even the most basic slice of bread. Or you could put it in a toasted sandwich with sliced banana. Or you could just eat it with a spoon...

100g soft unsalted butter
4 Tbsp golden syrup
2 tsp ground cinnamon
2 tsp ground ginger
1 tsp mixed spice
1 tsp Chinese five-spice
1/2 tsp ground cardamon
1/4 tsp salt

Put all ingredients in a small bowl and beat until smooth and fluffy. Eat immediately, or store in the fridge, covered.

Have a great weekend, everyone x

Friday, January 18, 2013

Treat me: Sticky red wine syrup

Of all the festive season leftovers, half-drunk bottles of wine are probably the hardest to deal with. Drinking them is the obvious solution, but there's only so much of that you can do before things get a bit messy. Freezing them in neat containers to add to risotto is another option that only works if your freezer isn't full of containers of stock you made from the ham bone. But in a bid to make some space in the fridge I devised this handy syrup that uses up the remains of a bottle of pinot noir and some strawberry jam. Even better, it can be poured over leftover icecream.


Red wine and strawberry syrup
This is really good poured over vanilla icecream and strawberries for a grown-up sundae, but you could also try it over pancakes or any kind of plain cake. I used strawberry jam because that's what we had, but another good fruity variety would work well. Not sure about raspberry though, unless you don't mind the pips. I'm quite keen to try one with white wine and marmalade, but we never seem to have any white wine left over...

250ml red wine
1/2 cup strawberry or raspberry jam
1/3 cup sugar
1/2 tsp red wine vinegar

Put the wine, jam and sugar in a small saucepan over medium heat. Let it simmer for 10-15 minutes, until syrupy (stirring occasionally). Remove from the heat and let cool, then taste. Add the vinegar (or a few drops of lemon juice) if it seems too sweet. Pour into a clean jar and store in the fridge.

Have a great weekend, everyone x

Friday, August 31, 2012

Treat me: Caramel sauce

Salted caramel has been so hot right now for so long it's a wonder we're not all suffering third-degree burns. In fact, when I saw this pic of Nigella on the cover of Stylist several months ago, burns were all I could think about. That and how they managed to capture the caramel dripping off her eyelashes.

Image from Stylist.co.uk
But while salted caramel is all well and good, that doesn't mean we should forget the original. Nor does it mean you can't add other new and exciting flavours.

Simple Caramel Sauce
This is very easy and very forgiving. If cook it too long it can be rescued with a splash of milk and more stirring. It's very good over vanilla ice cream or even plain Greek yoghurt. For a proper retro pudding, layer it in little glasses with crumbled gingernut biscuits and Greek yoghurt or whipped cream for a sort of instant trifle. I'm having camera issues today, but I assure you my sauce looks just like the one in the picture above. I can't say the same for the cook.

For the basic sauce:
225g 1 1/2 lightly packed cups soft brown sugar
4 Tbsp butter
3 Tbsp milk

Put everything in a small saucepan over gentle heat. Stir until it starts to boil, then let bubble away gently for five minutes. Remove from the heat and beat enthusiastically until smooth. You can use it straight away as is, or you can add either:
- two good pinches of flaky sea salt, from Maldon or Marlborough or Maine or Mooloolaba, or wherever the flaky sea salt is from in your neck of the woods
- OR: two generous teaspoons of ground ginger
- OR: one teaspoon of ground cardamom

Or you could go completely crazy and add the lot. Stir well, add a splash of milk if it seems very thick, and use as you see fit. Any leftover sauce can be stored, covered, in the fridge.

Oh, and before I forget, the lucky winners of The Kitchenmaid's second birthday giveaway are...
- Lynne, who wins the Equagold goodies
- Louise, who wins the stunning whitebait teatowel
- Melissa, who wins the Pratty's Tea
- and Bella, who trotted off to the New Zealand Chocolate Festival last Friday.

Have a great weekend, everyone. I'm going to hang out with Ruth Pretty and Dean Brettschneider on Sunday to learn some new tricks. Lucky me! x

Wednesday, August 22, 2012

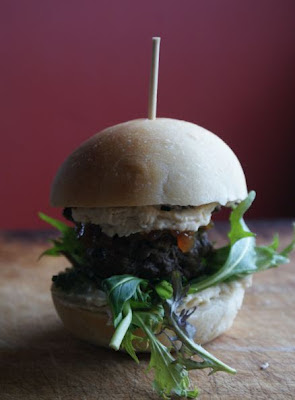
Lucy's little lamb burgers

The world - or at least the part of it I live in - has gone burger mad. Not only are more than 60 Wellington restaurants battling it out to win Burger Wellington 2012, but McDonald's have introduced a new lamb burger to their menu, using New Zealand lamb.
I can't vouch for the McDonald's burger (please don't ask me to) but I'm happy to give you my own recipe. We've been eating these baby burgers a lot lately - they're about a quarter of the size of a 'proper' burger but still very filling. You'll have to wait for the upcoming issue of Frankie to see how to make the baby buns - but in the meantime, here's how I construct our little lamb burgers.

Little Lamb Burgers

Little lamb burgers
You don't have to make these with lamb - in fact, the last time I made them I used a mixture of beef and lamb mince (a combination due in part to shopping sans glasses). The secret is to handle them as little as possible. Don't go squishing the mince in your hands for fun, treat it like you would a delicate fillet of fish (that's fillet, not a 'filet of fish').

500g good lamb mince
1 tsp salt
1 tsp sugar
1 red onion, finely chopped
about 1/2 tsp finely chopped fresh rosemary

Mix everything together and shape into flattish small balls - about 50g each. Line a tray with baking paper and put the burgers on top. Cover loosely and put in the fridge until about 15 minutes before you're ready to cook them.
To cook, either heat a heavy pan and fry them in a little oil, or bake them at 200C for about 15 minutes, turning once to brown both sides. I think the panfrying method gives a slightly better result, but baking has the benefits of being hands-free.

To assemble, spread a baby bun with hummus, then top with a tangle of baby salad leaves, a slice of beetroot (essential in a Kiwi burger), the burger, a dollop of redcurrant jelly or chutney and the bun 'lid'. For a beef burger, ditch the beetroot and add a slice of blue cheese.

Have you sampled any Burger Wellington offerings yet? Don't miss the one at Cafe Polo - it's the best burger I've ever eaten.

Wednesday, June 06, 2012

Chipotle mayo and tomato sauce

I don't know about where you are, but chipotle peppers have become very cool in a mainstream 'now-available-at-your-supermarket' sort of way. I've been reading about them for years in American books and was really excited to find them in the supermarket last year. I got the tin home, popped the lid off and shoved one in my mouth. Steam blew out of my ears for the next 30 minutes, which was about enough time to wonder why I'd neglected to realise that a dried and smoked jalapeño would be hotter than hell.

Since then I've been cautiously adding them to all sorts of things, but the best discovery so far is this one - chipotle mayonnaise. I made a huge vat of it to pour over homemade frites at the Small Girl's party. It took all my willpower not to just retire to my bed with a bowl of it and a spoon - and I actually took the leftovers to a work colleague because I just didn't trust myself with it.


Chipotle Mayonnaise
You might remember a post I did last year on how easy it is to make mayonnaise by hand. I stand by that claim, but if you're making a lot I think there's no shame in harnessing technology. No point in having that Magimix if it just collects dust, after all. I made double this amount for the party - the quantities below are more manageable unless you have a serious mayo habit (or a lot of friends).

2 free range egg yolks
1 tsp Dijon mustard
1 small clove of garlic, crushed to a paste with 1/4 tsp salt
1 tsp sugar
1 Tbsp wine vinegar
1 chipotle pepper in adobo sauce (plus a bit of the sauce)
3/4 cup oil (I use 1/2 cup extra virgin olive oil, 1/4 cup canola)

Put everything except the oil in a food processor and whiz to combine. Put the oil in a little jug. Turn the processor on and let the oil dribble in, very, very slowly, then gradually increase the volume to a thin stream, until the mixture is thick and glossy. Stop the machine and taste - add a little more adobo sauce, salt, or vinegar to taste and pulse again to mix. Scrape into a bowl, cover and refrigerate until ready to serve.

Now, not everyone likes mayonnaise, so I put a jug of tomato sauce on the table too. This is even easier than the mayo - saute a bit of finely sliced garlic in a slosh of olive oil until it's golden, then tip in a few tins of tomatoes. Turn the heat to low and let it simmer away gently for an hour or so, until it's thick and your house smells delicious.